Difference between revisions of "Easily make a pasted balsa strop"
m (Text replacement - "http://straightrazorpalace.com" to "https://straightrazorpalace.com") |
|||
| (9 intermediate revisions by 4 users not shown) | |||
| Line 1: | Line 1: | ||
| − | Originally posted by [ | + | This article contains descriptions by users of SRP for making a pasted balsa strop. |
| + | __FORCETOC__ | ||
| + | == Backpacker's<ref>Originally posted by [https://straightrazorpalace.com/members/backpackerx.html backpackerx] in https://straightrazorpalace.com/strops/24929-how-easily-make-pasted-balsa-strop.html</ref> pasted strop == | ||
| − | + | I just finished making a homemade balsa strop and thought I'd post here since it's so easy. I did this because I'm a newbie who has blown the budget for a while and can't buy one and also because it's so dead easy that even I, who have zero craftsman abilities, could do. Hopefully I can figure out how to get the pictures to post on here. | |
This literally requires 6 things. A porch or stair spindle from Home Depot ($2), a piece of Balsa from a craft store ($3), something to make one small 2" straight cut, a utility knife, glue, and some sand paper. I saw the spindle at Home Depot and noticed that if cut in half it would make a great base for the paddle and had a nice looking handle built right in! I simply cut the spindle in half, cut some balsa to fit the end, glued it on and sanded it to lap it flat. Cost about $5 and took about 10 minutes. See results below. The last picture is what the spindle looks like together. | This literally requires 6 things. A porch or stair spindle from Home Depot ($2), a piece of Balsa from a craft store ($3), something to make one small 2" straight cut, a utility knife, glue, and some sand paper. I saw the spindle at Home Depot and noticed that if cut in half it would make a great base for the paddle and had a nice looking handle built right in! I simply cut the spindle in half, cut some balsa to fit the end, glued it on and sanded it to lap it flat. Cost about $5 and took about 10 minutes. See results below. The last picture is what the spindle looks like together. | ||
| Line 12: | Line 14: | ||
</gallery> | </gallery> | ||
| − | '''The Slartibartfast | + | '''Alternative:''' |
| + | Instead of using the porch/stair spindle, you can use a wooden paint stir (free at places such as Lowe's Home Depot, etc. if you just ask.) The balsa doesn't need to be the same size as the paint stir, you can make it as wide as you like really. You can also use Contact Cement as an alternative to glue. | ||
| + | |||
| + | ==Slartibartfast's<ref>Originally posted by [https://straightrazorpalace.com/members/slartibartfast.html Slartibartfast] in https://straightrazorpalace.com/strops/32792-slartibartfast-pasted-balsa-strop.html</ref> pasted strop== | ||
Materials needed: | Materials needed: | ||
| − | Some type of solid backer, i cut a piece of 12x12 tile i had laying around. | + | * Some type of solid backer, i cut a piece of 12x12 tile i had laying around. |
| − | + | * Balsa: You can find this at most hobby stores. | |
| − | Balsa: You can find this at most hobby stores. | + | * Some kind of glue |
| − | + | * Clamps or something heavy to set on top once everything is glued down. | |
| − | Some kind of glue | ||
| − | |||
| − | Clamps or something heavy to set on top once everything is glued down. | ||
| − | |||
<gallery Caption:"Making The Slartibartfast Pasted Strop" widths="300px" heights="180px" perrow="2"> | <gallery Caption:"Making The Slartibartfast Pasted Strop" widths="300px" heights="180px" perrow="2"> | ||
Image:Pasted_balsa_strop_by_slart_001.JPG|Materials I used | Image:Pasted_balsa_strop_by_slart_001.JPG|Materials I used | ||
Image:Pasted_balsa_strop_by_slart_002.JPG|I use clamps, a heavy object will work too once you glue to 2 pieces together | Image:Pasted_balsa_strop_by_slart_002.JPG|I use clamps, a heavy object will work too once you glue to 2 pieces together | ||
| − | Image:Pasted_balsa_strop_by_slart_003.JPG|Make a | + | Image:Pasted_balsa_strop_by_slart_003.JPG|Make a grid on the balsa so you can lap it flat. |
| − | Image:Pasted_balsa_strop_by_slart_004.JPG|Use a figure 8 or x-pattern until the marks are gone. You may want to wipe down the balsa with a damp towel afterward. | + | Image:Pasted_balsa_strop_by_slart_004.JPG|Use a figure 8 or x-pattern until the marks are gone. You may want to wipe down the balsa with a damp towel afterward. *I have been thinking about this more and don't think this step is really that necessary. Feel free to do if you want though. |
| − | Image:Pasted_balsa_strop_by_slart_005.JPG|Mix the Chromium Oxide powder with some mineral oil | + | Image:Pasted_balsa_strop_by_slart_005.JPG|Mix the Chromium Oxide (CrO) powder with some mineral oil |
| − | Image:Pasted_balsa_strop_by_slart_006.JPG|Much | + | Image:Pasted_balsa_strop_by_slart_006.JPG|Much easier to spread now |
Image:Pasted_balsa_strop_by_slart_007.JPG|Draw an X pattern and then spread | Image:Pasted_balsa_strop_by_slart_007.JPG|Draw an X pattern and then spread | ||
Image:Pasted_balsa_strop_by_slart_008.JPG|What it looks like spread out. Note: this may be a little thick.... | Image:Pasted_balsa_strop_by_slart_008.JPG|What it looks like spread out. Note: this may be a little thick.... | ||
| Line 37: | Line 38: | ||
</gallery> | </gallery> | ||
| − | + | ||
== References == | == References == | ||
<references /> | <references /> | ||
| − | |||
[[Category:Stropping]] | [[Category:Stropping]] | ||
| + | [[Category:Do It Yourself]] | ||
Latest revision as of 10:35, 17 February 2018
This article contains descriptions by users of SRP for making a pasted balsa strop.
Backpacker's[1] pasted strop[edit | edit source]
I just finished making a homemade balsa strop and thought I'd post here since it's so easy. I did this because I'm a newbie who has blown the budget for a while and can't buy one and also because it's so dead easy that even I, who have zero craftsman abilities, could do. Hopefully I can figure out how to get the pictures to post on here.
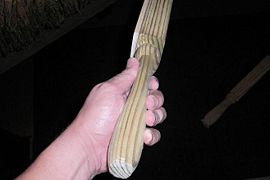
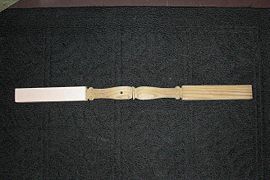
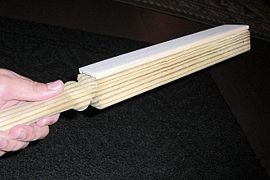
This literally requires 6 things. A porch or stair spindle from Home Depot ($2), a piece of Balsa from a craft store ($3), something to make one small 2" straight cut, a utility knife, glue, and some sand paper. I saw the spindle at Home Depot and noticed that if cut in half it would make a great base for the paddle and had a nice looking handle built right in! I simply cut the spindle in half, cut some balsa to fit the end, glued it on and sanded it to lap it flat. Cost about $5 and took about 10 minutes. See results below. The last picture is what the spindle looks like together.
- Making the strop


Alternative: Instead of using the porch/stair spindle, you can use a wooden paint stir (free at places such as Lowe's Home Depot, etc. if you just ask.) The balsa doesn't need to be the same size as the paint stir, you can make it as wide as you like really. You can also use Contact Cement as an alternative to glue.
Slartibartfast's[2] pasted strop[edit | edit source]
Materials needed:
- Some type of solid backer, i cut a piece of 12x12 tile i had laying around.
- Balsa: You can find this at most hobby stores.
- Some kind of glue
- Clamps or something heavy to set on top once everything is glued down.
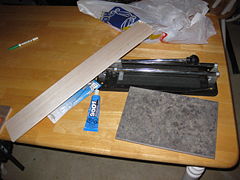
Materials I used
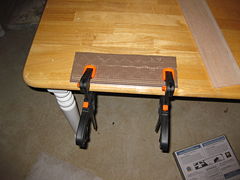
I use clamps, a heavy object will work too once you glue to 2 pieces together
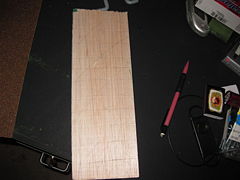
Make a grid on the balsa so you can lap it flat.
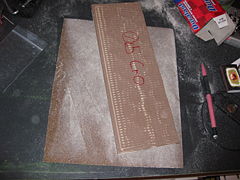
Use a figure 8 or x-pattern until the marks are gone. You may want to wipe down the balsa with a damp towel afterward. *I have been thinking about this more and don't think this step is really that necessary. Feel free to do if you want though.
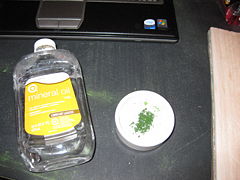
Mix the Chromium Oxide (CrO) powder with some mineral oil
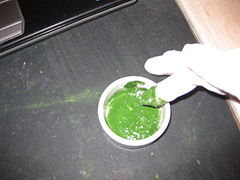
Much easier to spread now
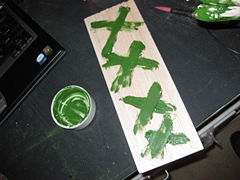
Draw an X pattern and then spread
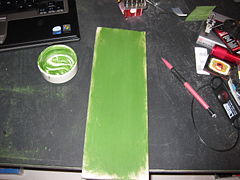
What it looks like spread out. Note: this may be a little thick....
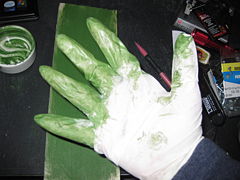
Why I wear gloves when applying CrO
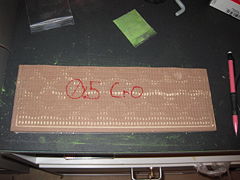
Mark your pasted strop to avoid confusion later


References[edit | edit source]
- ↑ Originally posted by backpackerx in https://straightrazorpalace.com/strops/24929-how-easily-make-pasted-balsa-strop.html
- ↑ Originally posted by Slartibartfast in https://straightrazorpalace.com/strops/32792-slartibartfast-pasted-balsa-strop.html