Difference between revisions of "Hand sanding a blade"
m (Types of sand paper and where to get them) |
m (Text replacement - "http://straightrazorpalace.com" to "https://straightrazorpalace.com") |
||
| (15 intermediate revisions by 6 users not shown) | |||
| Line 1: | Line 1: | ||
| − | + | This article was originally posted by [https://straightrazorpalace.com/members/bruno.html Bruno]<ref>https://straightrazorpalace.com/workshop/17007-handsanding-howto.html</ref> | |
| − | + | The purpose of hand sanding is to bring a blade back to a near perfect finish, regardless of how badly damaged it was. Otherwise you might as well use a Dremel and sanding discs. Those sanding discs and drum wheels cost money, and if you have to remove bad pitting, you will spend a lot. | |
| − | The | + | == The ergonomics == |
| − | + | Hand sanding a badly damage blade can take up 10 hours or more to do it right. Holding the sandpaper in your hand, or keeping it wrapped around something is a sure way to attract [http://en.wikipedia.org/wiki/Tendinitis tendinitis]. Been there, done that, found a better way. | |
| − | + | <gallery caption="Bruno's Sanding Stick" widths="400px" heights="280px" perrow="2"> | |
| − | |||
| − | <gallery caption="Bruno's Sanding Stick" widths=" | ||
Image:Handsanding_howto_sandpaper_holder.jpg | This is my sanding stick. It looks like crap, but it does the job well. I made it from some scrap wood, and it fits my hand just right. | Image:Handsanding_howto_sandpaper_holder.jpg | This is my sanding stick. It looks like crap, but it does the job well. I made it from some scrap wood, and it fits my hand just right. | ||
Image:Handsanding_howto_sander_readyforaction.jpg | The sanding stick with sandpaper on it - ready for action. | Image:Handsanding_howto_sander_readyforaction.jpg | The sanding stick with sandpaper on it - ready for action. | ||
| − | </gallery> | + | </gallery> The big part just fits in my hand, and I usually keep my index finger touching the thin part when I hold it. This way all tendons are in a relaxed state when I sand. The tip is wrapped with a strip of leather. This helps distribute the pressure evenly. The wood underneath it will have some irregularities that are visible otherwise when sanding with finer grits. |
| + | |||
| + | If the sandpaper gets loaded with crud, I move the strip of paper a couple of mm and continue. <gallery caption="PaulX608's Walnut Block" widths="400px" heights="280px" perrow="2"> | ||
| + | Image:PaulX608-Restoblock1.JPG | I needed a block to hold the blade for sanding so I made this from walnut. I routed away most of the top to leave a ridge for the spine and inlaid a pretty powerful ceramic magnet. | ||
| + | Image:PaulX608-Restoblock2.JPG | I used a business card to keep from damaging the blade with the magnet.<ref>[https://straightrazorpalace.com/members/paulx608.html PaulX608] in https://straightrazorpalace.com/workshop/35367-my-first-restoration.html</ref> | ||
| + | </gallery> | ||
| + | |||
| + | == Types of sand paper and where to get them == | ||
| + | |||
| + | A good place from which to get sand paper is an auto supply shop. The sand paper sold there is usually silicon carbide wet dry sandpaper. Grits carried are usually 220, 400, 600, 800, 1000, 1200 and 2000. | ||
| + | |||
| + | The price varies depending on the brand. 3M is rated as the best by the majority of [https://straightrazorpalace.com/ SRP] members, but it is expensive. There are cheaper brands that will get the job done. Most auto supply or body shops will carry other brands. | ||
| + | |||
| + | Regular woodworking sandpaper is Garnet, which, incidentally, is not good for metal. | ||
| + | |||
| + | [[Image:Types of abrasives.jpg]] | ||
| + | |||
| + | == The sanding itself == | ||
| + | |||
| + | Let me tell about the difficult part: damage removal. This is the most tedious part of sanding, because if a blade is pitted, you have to take away a LOT of metal to remove the pitting, and you have to take away metal across the length of the blade, or you will end up with a blade that looks like some metal was scooped out of it. | ||
| + | |||
| + | Experience has taught me that the best way to remove pitting is by first sanding circular with a very low grit (80 - 120). | ||
| + | |||
| + | === Circular sanding === | ||
| − | + | [[Image:Handsanding howto circular sanding.jpg]] | |
| − | If | + | Circular sanding works quickest, and I think this is why: if you sand circular while going back and forth a bit, you are always sanding across (and NOT along) previous scratch lines. If you hit scratch lines from a different direction, they will come off much more easily than if you sand along the same direction continuously. Especially if there is a lot of pitting, you want metal removal to go as fast as possible. |
| − | + | Every now and again when the blade is completely scratched and satin looking, you sand back and forth along the blade until it is semi mirror shine. Even at high grits this is pretty easy, and you will quickly get an idea of where you're at. | |
| − | + | === Lengthwise sanding === | |
| − | + | [[Image:Handsanding howto lengthwise sanding.jpg]] | |
| − | + | Instead of circular sanding you could also speed up metal removal by sanding first from spine to edge, and then from heel to toe, and then from spine to edge again, but sanding from spine to edge is uncomfortable because the distance is so short. Note that if you sand in the spine - edge direction, you should NOT sand across the line where the spine hits the stone. For many razors this is obvious since the spine itself is nearly flat. However, some spines are wider. If you then sand all the way to the top of the spine, you erase the demarcation line between the blade and the spine. While this does not change the honing angle from a functional pov, you'll lose the crisp look of the spine. | |
| − | + | As soon as all the damage is gone you are ready to go up in grit. Don't go up sooner because low grit is the fastest way to remove damage. Don't even think about sanding away left over pits with 400 grit paper, no matter how fed up you are with low grit sanding. | |
| − | + | === Progression of grits used === | |
| − | + | As soon as I am satisfied that the damage is gone, I use the following progression: 150 180 240 320 400 600 1000 1200 1500 2000. | |
| − | + | At 240 I change my sanding method. From then onwards I will do 1 grit from edge to spine until all the previous scratch lines are gone. Then I go to the next grit and go from heel to toe until all previous scratch lines are gone. | |
| − | + | If you removed all the pitting with the low grit, then from 400 onwards it takes very little time to progress. | |
| − | + | By the time you hit 2000, the blade will be mirror shining, and ready for the Dremel, buffing wheel and polishing compound. | |
| − | == | + | == Hand sanding and polishing in action == |
| − | + | <gallery caption="Undream's FW Engels" widths="400px" heights="280px" perrow="2"> | |
| + | Image:Undream - Hand Sanding and Dremeling hiz1.JPG | The razor in its initial state | ||
| + | Image:Undream - Hand Sanding and Dremeling 320.JPG | 320 grit | ||
| + | Image:Undream - Hand Sanding and Dremeling 400.JPG | 400 grit | ||
| + | Image:Undream - Hand Sanding and Dremeling 600.JPG | 600 grit | ||
| + | Image:Undream - Hand Sanding and Dremeling 1500.JPG | 1500 grit | ||
| + | Image:Undream - Hand Sanding and Dremeling polish.JPG | The same razor after after low speed felt wheel with emery compound | ||
| + | </gallery> | ||
| − | + | == In Praise of Hand Sanding Before Polishing == | |
| − | + | It might be interesting to graphically show the difference that careful sanding of a blade can make during restoration. To that I end we present a pair of buffed out blades. To keep the story interesting, there is a good blade which was rubbed over with lots of sandpaper before getting friendly with the polishing mops and a not-so-good blade which took the quick trip to the polisher in ‘as was’ condition. | |
| − | + | [Note: The polishing work was done with a Creusen 6” polisher. It draws something like 500 watts of power and runs dependably and what is more important, fairly quietly. Of course, a polishing machine is useless without the extras, so we also have a fair amount in buffing wheels and polishing compounds. This process involves six different grades of polishing compounds which takes our [[On Steel|steel]] from a dull sheen up to a mirror finish. Although it is a 6" polisher, the decision was taken to use buffing wheels and mops of 4" and 3" diameters. ‘nuff said and on with the info.] | |
| − | + | <br><gallery caption="Comparisons of Blade Polishing Finish" widths="400px" heights="280px" perrow="2"> | |
| + | Image:01_gottlieb_original.jpg | Our good blade is a Gottlieb-Hammersfahr Spanish point which has been sitting for some time, waiting to be brought to a good finish. You can see its original condition in this photograph. There was a fair amount of staining and a whole lot of pitting. Due to the lighting, the pitting isn’t so very evident in this photo, but it’s there, both back and front. | ||
| + | Image:02_razors.jpg | Gritting our teeth, we hit the blade with sandpaper and elbow grease… lots of elbow grease. First some application of flap wheels for the worst of the pitting, and then through progressively finer grades of sandpaper up to 2500 grit. Something like ten to twenty hours of quality time was spent on that puppy. At that point it was really nice, but needed polishing to take it to the next level. The not-so-good blade is a rather nice, no-name blade simply stamped with the word ‘Solingen’ on the tang, the same word having been etched into the blade. There is no ‘before’ picture for this one, but you will understand that it was in about the same condition as the other blade: a little pitting, a little staining, a little rust. Here you can see both blades in the buffed out condition. If one gives just a casual glance they both appear to be reasonably shiny and nicely finished. But as we want total honesty we will zoom in a bit closer to see the important differences. | ||
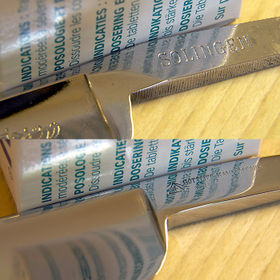
| + | Image:03_solingen_side.jpg | We slipped an extension tube onto the lens of the camera and moved in a bit closer. Our photograph brings us in tight on the blade of the ‘Solingen’. We have a shiny blade here, but polishing has done nothing to reduce the pitting. | ||
| + | Image:04_gottlieb_side.jpg | This photograph shows the side of the ‘Gottlieb-Hammersfahr’. This one is still looking pretty good. So, time to slip on another extension tube and ease in a bit closer. | ||
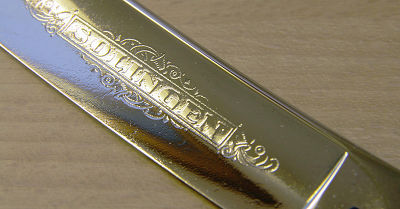
| + | Image:05_logos.jpg | In this photo we are getting up close and personal on the tangs of the respective blades. The ‘Solingen’ blade now looks a bit more like cast metal than shiny steel. The ‘Gottlieb’ blade is better but is also showing its leftover pitting. It must be admitted that we were not able to actually remove all that pitting by sanding without severely eradicating parts of the logo. Since the idea was to hold onto the identifying marks, a compromise was made on the amount of sanding in this location. Even so, one can clearly see the quality difference in finish between the two blades. | ||
| + | Image:06_tang.jpg | Yet another closeup where we have placed the two blades against another object in order to show the reflection of a background image. Again, note the surface quality differences. | ||
| + | Image:07_reflection.jpg | Here is another example of reflections off of the polished blades. In both of these photographs it is easy to see that the ‘Gottlieb’ blade, having enjoyed the benefits of careful sanding, is the clear winner over the ‘Solingen’ in terms of surface finish and cleanliness of reflection. A point needs to be made. We did our very best to finish and polish both blades to as high a level of surface finish as possible, but there are going to be limits to what you can get out of some blades and some steels. Even after all of our TLC, the ‘Gottlieb’ blade still has some little pits and imperfections that couldn’t be eliminated. Some of that was left intentionally, but some of it was just there in the steel in the form of little imperfections and impurities from when the blade was originally forged. Just got’ta live with it. | ||
| + | Image:08_hammer.jpg | And since we are talking about polishing, We are going to leave you with a final photo and a bit of advice. This snapshot shows the face of the little ball peen hammer we use to set our razor pins. You will notice that it, too, has a fine, polished finish. Why did we do this? That shiny surface on the hammer face imparts the same shiny surface to the head of the rivets. If the hammer was all scuffed and dingy, our rivets would end up the same way. | ||
| − | + | </gallery> | |
| − | + | == References == | |
| − | + | <references /> | |
| − | [[Category: | + | [[Category:Blade_Restoration]] |
| − | |||
Latest revision as of 10:47, 17 February 2018
This article was originally posted by Bruno[1]
The purpose of hand sanding is to bring a blade back to a near perfect finish, regardless of how badly damaged it was. Otherwise you might as well use a Dremel and sanding discs. Those sanding discs and drum wheels cost money, and if you have to remove bad pitting, you will spend a lot.
Contents
The ergonomics[edit | edit source]
Hand sanding a badly damage blade can take up 10 hours or more to do it right. Holding the sandpaper in your hand, or keeping it wrapped around something is a sure way to attract tendinitis. Been there, done that, found a better way.
- Bruno's Sanding Stick
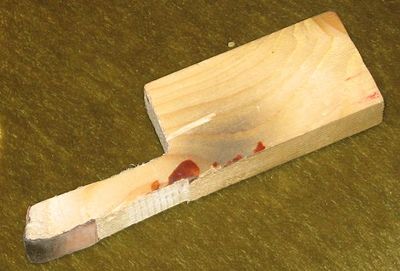
This is my sanding stick. It looks like crap, but it does the job well. I made it from some scrap wood, and it fits my hand just right.
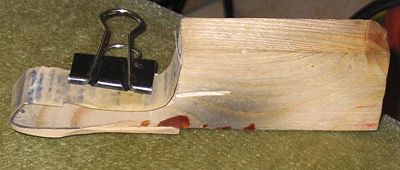
The sanding stick with sandpaper on it - ready for action.


- PaulX608's Walnut Block
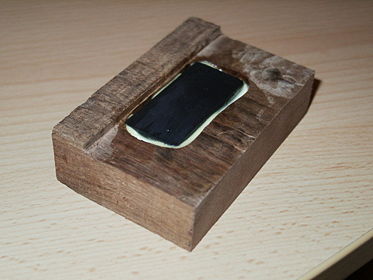
I needed a block to hold the blade for sanding so I made this from walnut. I routed away most of the top to leave a ridge for the spine and inlaid a pretty powerful ceramic magnet.
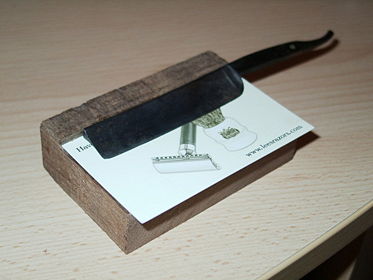
I used a business card to keep from damaging the blade with the magnet.[2]


Types of sand paper and where to get them[edit | edit source]
A good place from which to get sand paper is an auto supply shop. The sand paper sold there is usually silicon carbide wet dry sandpaper. Grits carried are usually 220, 400, 600, 800, 1000, 1200 and 2000.
The price varies depending on the brand. 3M is rated as the best by the majority of SRP members, but it is expensive. There are cheaper brands that will get the job done. Most auto supply or body shops will carry other brands.
Regular woodworking sandpaper is Garnet, which, incidentally, is not good for metal.

The sanding itself[edit | edit source]
Let me tell about the difficult part: damage removal. This is the most tedious part of sanding, because if a blade is pitted, you have to take away a LOT of metal to remove the pitting, and you have to take away metal across the length of the blade, or you will end up with a blade that looks like some metal was scooped out of it.
Experience has taught me that the best way to remove pitting is by first sanding circular with a very low grit (80 - 120).
Circular sanding[edit | edit source]

Circular sanding works quickest, and I think this is why: if you sand circular while going back and forth a bit, you are always sanding across (and NOT along) previous scratch lines. If you hit scratch lines from a different direction, they will come off much more easily than if you sand along the same direction continuously. Especially if there is a lot of pitting, you want metal removal to go as fast as possible.
Every now and again when the blade is completely scratched and satin looking, you sand back and forth along the blade until it is semi mirror shine. Even at high grits this is pretty easy, and you will quickly get an idea of where you're at.
Lengthwise sanding[edit | edit source]

Instead of circular sanding you could also speed up metal removal by sanding first from spine to edge, and then from heel to toe, and then from spine to edge again, but sanding from spine to edge is uncomfortable because the distance is so short. Note that if you sand in the spine - edge direction, you should NOT sand across the line where the spine hits the stone. For many razors this is obvious since the spine itself is nearly flat. However, some spines are wider. If you then sand all the way to the top of the spine, you erase the demarcation line between the blade and the spine. While this does not change the honing angle from a functional pov, you'll lose the crisp look of the spine.
As soon as all the damage is gone you are ready to go up in grit. Don't go up sooner because low grit is the fastest way to remove damage. Don't even think about sanding away left over pits with 400 grit paper, no matter how fed up you are with low grit sanding.
Progression of grits used[edit | edit source]
As soon as I am satisfied that the damage is gone, I use the following progression: 150 180 240 320 400 600 1000 1200 1500 2000.
At 240 I change my sanding method. From then onwards I will do 1 grit from edge to spine until all the previous scratch lines are gone. Then I go to the next grit and go from heel to toe until all previous scratch lines are gone.
If you removed all the pitting with the low grit, then from 400 onwards it takes very little time to progress.
By the time you hit 2000, the blade will be mirror shining, and ready for the Dremel, buffing wheel and polishing compound.
Hand sanding and polishing in action[edit | edit source]
- Undream's FW Engels
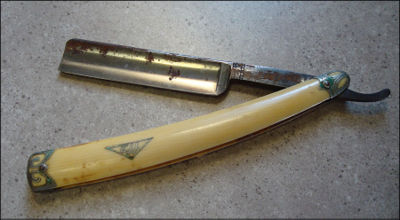
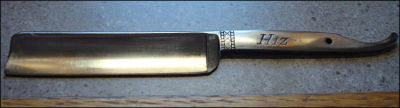
The razor in its initial state
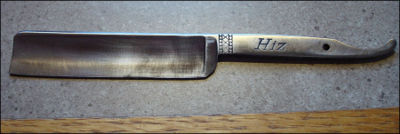
320 grit
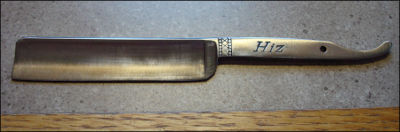
400 grit
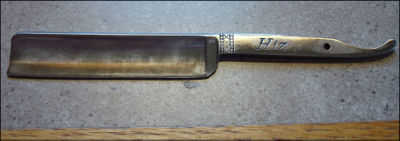
600 grit
1500 grit
The same razor after after low speed felt wheel with emery compound


In Praise of Hand Sanding Before Polishing[edit | edit source]
It might be interesting to graphically show the difference that careful sanding of a blade can make during restoration. To that I end we present a pair of buffed out blades. To keep the story interesting, there is a good blade which was rubbed over with lots of sandpaper before getting friendly with the polishing mops and a not-so-good blade which took the quick trip to the polisher in ‘as was’ condition.
[Note: The polishing work was done with a Creusen 6” polisher. It draws something like 500 watts of power and runs dependably and what is more important, fairly quietly. Of course, a polishing machine is useless without the extras, so we also have a fair amount in buffing wheels and polishing compounds. This process involves six different grades of polishing compounds which takes our steel from a dull sheen up to a mirror finish. Although it is a 6" polisher, the decision was taken to use buffing wheels and mops of 4" and 3" diameters. ‘nuff said and on with the info.]
- Comparisons of Blade Polishing Finish
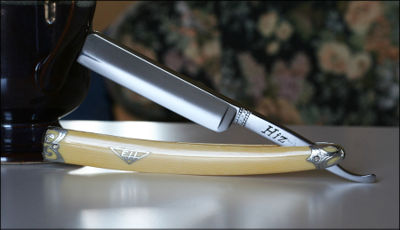
Our good blade is a Gottlieb-Hammersfahr Spanish point which has been sitting for some time, waiting to be brought to a good finish. You can see its original condition in this photograph. There was a fair amount of staining and a whole lot of pitting. Due to the lighting, the pitting isn’t so very evident in this photo, but it’s there, both back and front.
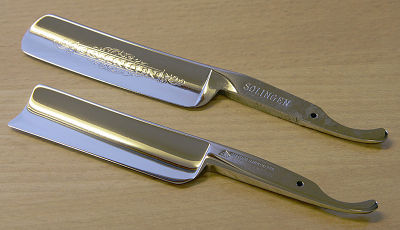
Gritting our teeth, we hit the blade with sandpaper and elbow grease… lots of elbow grease. First some application of flap wheels for the worst of the pitting, and then through progressively finer grades of sandpaper up to 2500 grit. Something like ten to twenty hours of quality time was spent on that puppy. At that point it was really nice, but needed polishing to take it to the next level. The not-so-good blade is a rather nice, no-name blade simply stamped with the word ‘Solingen’ on the tang, the same word having been etched into the blade. There is no ‘before’ picture for this one, but you will understand that it was in about the same condition as the other blade: a little pitting, a little staining, a little rust. Here you can see both blades in the buffed out condition. If one gives just a casual glance they both appear to be reasonably shiny and nicely finished. But as we want total honesty we will zoom in a bit closer to see the important differences.
We slipped an extension tube onto the lens of the camera and moved in a bit closer. Our photograph brings us in tight on the blade of the ‘Solingen’. We have a shiny blade here, but polishing has done nothing to reduce the pitting.
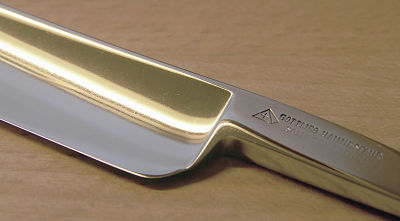
This photograph shows the side of the ‘Gottlieb-Hammersfahr’. This one is still looking pretty good. So, time to slip on another extension tube and ease in a bit closer.

In this photo we are getting up close and personal on the tangs of the respective blades. The ‘Solingen’ blade now looks a bit more like cast metal than shiny steel. The ‘Gottlieb’ blade is better but is also showing its leftover pitting. It must be admitted that we were not able to actually remove all that pitting by sanding without severely eradicating parts of the logo. Since the idea was to hold onto the identifying marks, a compromise was made on the amount of sanding in this location. Even so, one can clearly see the quality difference in finish between the two blades.
Yet another closeup where we have placed the two blades against another object in order to show the reflection of a background image. Again, note the surface quality differences.
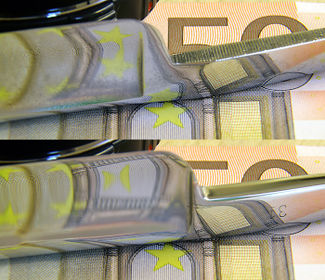
Here is another example of reflections off of the polished blades. In both of these photographs it is easy to see that the ‘Gottlieb’ blade, having enjoyed the benefits of careful sanding, is the clear winner over the ‘Solingen’ in terms of surface finish and cleanliness of reflection. A point needs to be made. We did our very best to finish and polish both blades to as high a level of surface finish as possible, but there are going to be limits to what you can get out of some blades and some steels. Even after all of our TLC, the ‘Gottlieb’ blade still has some little pits and imperfections that couldn’t be eliminated. Some of that was left intentionally, but some of it was just there in the steel in the form of little imperfections and impurities from when the blade was originally forged. Just got’ta live with it.

And since we are talking about polishing, We are going to leave you with a final photo and a bit of advice. This snapshot shows the face of the little ball peen hammer we use to set our razor pins. You will notice that it, too, has a fine, polished finish. Why did we do this? That shiny surface on the hammer face imparts the same shiny surface to the head of the rivets. If the hammer was all scuffed and dingy, our rivets would end up the same way.


