Difference between revisions of "DSLR And Reversed Lens As Microscope"
m |
m (Text replacement - "http://straightrazorpalace.com" to "https://straightrazorpalace.com") |
||
| (34 intermediate revisions by 4 users not shown) | |||
| Line 1: | Line 1: | ||
| − | ''Abstract: This article demonstrates how to use a DSLR camera with a reversed lens for taking high level magnification images and as a simple yet powerful microscope.'' | + | ''Abstract: This article demonstrates how to use a DSLR camera with a reversed lens for taking high level magnification images of razor edges, and as a simple yet powerful microscope.'' |
| − | |||
| − | |||
| − | |||
== Goal == | == Goal == | ||
| − | + | The goal of this article is to show you how to take pictures like the ones in this page with your photo equipment for cheap. The "trick" discussed here is use of reversed wide angle primes on DSLR bodies. Good information about this technique can be found on internet with ease. Here is an excellent example: http://photography-on-the.net/forum/showthread.php?t=239915 | |
| − | The goal of this article is to show you how to take pictures like the ones in this page with your photo equipment for cheap. The "trick" discussed here is use of reversed wide angle primes on DSLR bodies. | ||
| − | <gallery perrow="1" widths=" | + | <gallery perrow="1" widths="800px"> |
| − | image:DSLR_microscope_01.png | | + | image:DSLR_microscope_01.png | Detail of an edge of J.Elliot's Best Silver Steel. |
</gallery> | </gallery> | ||
| − | == Prerequisites | + | == Prerequisites == |
| − | |||
#A DSLR camera of any brand or vintage that allows for manual focus lenses | #A DSLR camera of any brand or vintage that allows for manual focus lenses | ||
| − | + | #A wide-ish (prime) lens for a 35mm camera with manual aperture control. Some wide zooms may work as well. | |
| − | #A wide-ish prime lens for a 35mm camera with manual aperture control | ||
| − | |||
#An adapter for reverse mounting of your lens to your DSLR body | #An adapter for reverse mounting of your lens to your DSLR body | ||
| − | |||
#A tripod | #A tripod | ||
| − | |||
#A well lit surface for placing your razor such as a kitchen counter top | #A well lit surface for placing your razor such as a kitchen counter top | ||
| + | #Patience and will to experiment | ||
| − | + | === Camera === | |
| + | Any DSLR camera with a support for manual focus lenses should work as long as you can get a reverse adapter for it. Author uses a 4/3rds Panasonic DMC-L1 but most (if not all) DSLRs should work (except for those dumbed-down by their manufacturer to force you to use their expensive auto focus lenses). Author highly recommends cameras with Live view as they make focusing easy and that can also work as high magnification microscopes. | ||
| − | == | + | <gallery perrow="1" widths="800px"> |
| + | image:DSLR_microscope_My_rig.png | Author's rig. Camera on tripod, lens attached via two adapters, chopsticks for laying the razor flat, a LED flashlight for illumination. | ||
| + | </gallery> | ||
| − | |||
=== Lens === | === Lens === | ||
| − | + | High magnification macro pictures can be taken with reverse mounted fixed focal length lenses. The general rule of thumb is: the shorter the focal length of the lens is, the higher the magnification but also the narrower the depth of field and the closer the focus distance (too wide == too close to the lens). Usable focal length range is typically between 25-50mm (in 35mm format terms). The lens should have a manual aperture control as it can not be electrically linked to a camera. Note that as the mounting is done via the lens's filter thread, it does not have to be from the same manufacturer as the camera. | |
| − | High magnification macro pictures can be taken with reverse mounted fixed focal length lenses. The general rule of thumb is: the shorter the focal length of the lens is, the higher the magnification but also the narrower the depth of field. Usable focal length range is typically between | ||
| − | + | Author uses a f=29mm vintage Exakta lens (Meyer Görlitz Orestegon 2.8/29) on a 4/3rds body. This combination yields magnification demonstrated below. | |
| − | <gallery | + | <gallery widths="300px" heights="200" perrow="2"> |
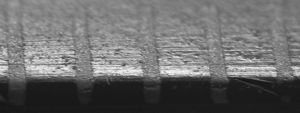
| − | image: | + | image:DSLR_microscope_06.png | 1mm ticks on a plastic ruler. Highest magnification of my rig (click to see full size). |
| + | image:DSLR_microscope_02.png | Total 4mm in 1mm ticks on a ruler. Lens stopped down to f/16. | ||
</gallery> | </gallery> | ||
| − | + | ||
| + | Hidden bonus: you can use the same lens for direct observation of edges during honing. They are better than many cheap microscopes out there. | ||
| + | |||
=== Adapter === | === Adapter === | ||
| + | Adapters for reverse mounting of lenses are readily available on 'bay for less than $10 (see http://shop.ebay.com/i.html?_nkw=reverse+lens+adapter). They mount lenses via their front filter thread so make sure you have a match against your camera body AND against the filter size of your lens. Author uses a combination of two adapters - a filter thread to Exakta body adapter and an Exakta lens to 4/3rds body adapter to mount the Orestegon to the L1. | ||
| − | + | <gallery perrow="1" widths="800px"> | |
| + | image:DSLR_microscope_04.jpg | 52mm filter-to-EOS mount adapter for Canon cameras. | ||
| + | </gallery> | ||
=== Tripod === | === Tripod === | ||
| − | + | A solid tripod is a must. Slightest camera vibrations will ruin your pictures. You can use anything that lets you place the camera near a counter top or any other well lit surface where the razors will be placed. | |
| − | A solid tripod is a must. You can use anything that lets you place the camera near a counter top or any other well surface where the razors will be placed. | ||
=== Well lit surface === | === Well lit surface === | ||
| + | Obviously, anything works as long as the place is well lit and the razor is safe. Keep in mind that variations in lighting will make it impossible to compare a series of pictures. With fixed light, your changes of repeating the exact lighting conditions may be higher. Note that the relative position of the edge vs. the light source has tremendous impact on the final images, see below. | ||
| − | + | <gallery perrow="2" widths="350px"> | |
| + | image:DSLR_microscope03.png | Example of badly chosen light position. | ||
| + | image:DSLR_microscope_05.png | Same edge, same magnification, better lighting angle. | ||
| + | </gallery> | ||
| − | + | Hint: It is better to have dark background against the edge. | |
| − | |||
| − | |||
| − | |||
== Taking Pictures == | == Taking Pictures == | ||
| − | + | Here is an example just for your entertainment and inspiration. You are a skilled photographer and so you will likely figure out a better method quickly.:) | |
| − | Here is an example just for your entertainment and inspiration. You are | ||
Mount the lens to the camera via the reverse adapter. Switch your camera to a mode that allows use of manual focus lenses and switch on the live view if available. Place the camera on a tripod and place it near the counter top. Place a sheet of newspaper on the counter top and play with the tripod and the camera (position, angles, distance) until you get a straight and well focused picture of the newspaper in the viewfinder or on the LCD. Place the razor edge near the center of focus and re-adjust the camera and razor positions until you get a well focused image of the edge. Mind how the razor's edge is lit. You will have to focus with distance - with moving the edge forth and back. It can be confusing initially but one gets used to it quickly. When well focused, take the picture but make sure you do not shake or move the camera (remote shutter release or self-time use is HIGHLY recommended). Feel free to experiment with apertures, the smaller the aperture the larger the DOF but also the longer the exposure. | Mount the lens to the camera via the reverse adapter. Switch your camera to a mode that allows use of manual focus lenses and switch on the live view if available. Place the camera on a tripod and place it near the counter top. Place a sheet of newspaper on the counter top and play with the tripod and the camera (position, angles, distance) until you get a straight and well focused picture of the newspaper in the viewfinder or on the LCD. Place the razor edge near the center of focus and re-adjust the camera and razor positions until you get a well focused image of the edge. Mind how the razor's edge is lit. You will have to focus with distance - with moving the edge forth and back. It can be confusing initially but one gets used to it quickly. When well focused, take the picture but make sure you do not shake or move the camera (remote shutter release or self-time use is HIGHLY recommended). Feel free to experiment with apertures, the smaller the aperture the larger the DOF but also the longer the exposure. | ||
When everything goes as planned, you should be getting pictures like those in this page or better. | When everything goes as planned, you should be getting pictures like those in this page or better. | ||
| + | |||
| + | <gallery perrow="1" widths="800px"> | ||
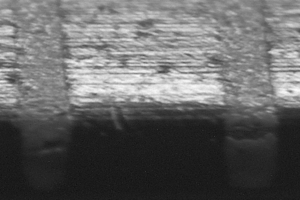
| + | image:DSLR_microscope_07.png | Razor bevel with human hair. Green channel, resized, sharpened. | ||
| + | </gallery> | ||
| + | |||
== Post-processing == | == Post-processing == | ||
| + | In order to achieve maximum sharpness, author recommend shooting raw or highest quality jpg files and post-processing them in your favorite editor. Author has been using Picture Window Pro with excellent results for years (inexpensive, works with 16bpc, can process very very very large files (i.e. large scans of 8x10 negatives) and does not require big hardware). You will need crop, resize, brightness curve and sharpness adjustments. | ||
| + | |||
| + | Hint: toss the RGB and work with grayscale only. Author's preferred method is using the green channel as it has usually the least noise (a trick learned when working with scanners). | ||
| + | |||
| + | <gallery perrow="1" widths="800px"> | ||
| + | image:Color_channels.png | Original RGB picture, green channel, red channel. | ||
| + | </gallery> | ||
| − | |||
== Using Camera as a Microscope == | == Using Camera as a Microscope == | ||
| − | + | In order to be able to see the magnified picture on the camera LCD instead of in the viewfinder, the camera needs to have Live view. Switch it on and use the "digital zoom" for highest magnification (if your camera is equipped with one). It works very well on author's DMC-L1. | |
| − | In order to be able to see the magnified picture on the camera LCD instead of in the viewfinder, the camera needs to have Live view. Switch it on and use the "digital zoom" for highest magnification (if your camera is equipped with one). It works very well on | ||
== Troubleshooting == | == Troubleshooting == | ||
| − | |||
Under construction | Under construction | ||
== Geometry, calculations, magnification == | == Geometry, calculations, magnification == | ||
| + | Under constructions. Volunteers are welcome. :) | ||
| + | |||
| + | == Gallery == | ||
| + | |||
| + | === Progression of coarse to fine natural hones === | ||
| + | An edge honed on aoto, aoto slurry on C12K, washita, coticule with slurry. Each picture was taken after several dozens of laps on each stone when swarf was clearly detectable in slurry. Author tried to take a picture of the same section of an edge and marked the blade with a black marker. He had, however, re-draw the mark quite often, hence the fit is not 100% perfect. | ||
| + | |||
| + | Click on the pictures for high resolution versions. | ||
| + | |||
| + | <gallery perrow="1" widths="800px"> | ||
| + | image:DSLR microscope pr1 begin.jpg | Edge before honing. | ||
| + | image:DSLR microscope pr1 after aoto.jpg | Edge after author's (questionable quality) aoto. Notice the chips. | ||
| + | image:DSLR microscope pr1 after c12kwaotoslurry.jpg | Edge after C12K w/aoto slurry. Chips almost removed. | ||
| + | image:DSLR microscope pr1 after washita.jpg | Edge after a stone that author guesses is a washita. | ||
| + | image:DSLR microscope pr1 after coticuleslurry.jpg | Edge after a coticule w/ heavy slurry. Polishing very noticeable compared to previous hones. | ||
| + | image:DSLR microscope after bbw.png | Edge after a BBW w/ slurry. | ||
| + | image:DSLR Microscope after coticule water.png | Edge after a three dozens of laps on coticule w/ water only. | ||
| + | image:DSLR microscope after charnley.png | Edge after several dozens of laps on Charnley forest w/ water and detergent. | ||
| + | </gallery> | ||
| + | |||
| + | === Surfaces of natural hones === | ||
| + | Pictures of surfaces of hones used in the previous progression. | ||
| + | <gallery perrow="3" widths="250px"> | ||
| + | image:DSLR microscope pr1 aoto.png | Surface of author's [[Aoto,_Blue|Aoto]] (this is what it looks like after several dozens of laps). | ||
| + | image:DSLR microscope pr1 washita.png | Surface of a hone that author guesses is a Washita stone. | ||
| + | image:DSLR microscope pr1 coticule.png | Surface of author's [[Coticule,_Vintage,_Solid|Coticule]] (perhaps one from the La Petite Blanche layer?). The white "bumps" form the typical pattern on the surface. | ||
| + | image:DSLR microscope bbw.png | Surface of author's [[Blue_Belgian_Whetstone|Belgian Blue Whetstone]] (BBW). | ||
| + | image:DSLR microscope coticule swarf.png | Coticule with swarf after honing w/ water only. | ||
| + | image:DSLR microscope charnley forest.png | Surface of author's [[Charnley Forest]]. | ||
| + | </gallery> | ||
| − | |||
| − | |||
== Discussion, comments == | == Discussion, comments == | ||
| + | Please add your comments, complaints, experience and links to your pictures [[Talk:DSLR_And_Reversed_Lens_As_Microscope |to the discussion page of this article]]. | ||
| − | + | == Acknowledgements == | |
| − | + | This article was written by [https://straightrazorpalace.com/members/sparq.html Sparq] (a.k.a "Author") | |
| − | + | [[Category:Photography]] | |
Latest revision as of 10:45, 17 February 2018
Abstract: This article demonstrates how to use a DSLR camera with a reversed lens for taking high level magnification images of razor edges, and as a simple yet powerful microscope.
Contents
Goal[edit | edit source]
The goal of this article is to show you how to take pictures like the ones in this page with your photo equipment for cheap. The "trick" discussed here is use of reversed wide angle primes on DSLR bodies. Good information about this technique can be found on internet with ease. Here is an excellent example: http://photography-on-the.net/forum/showthread.php?t=239915
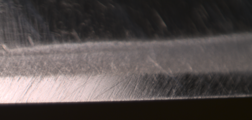
Detail of an edge of J.Elliot's Best Silver Steel.

Prerequisites[edit | edit source]
- A DSLR camera of any brand or vintage that allows for manual focus lenses
- A wide-ish (prime) lens for a 35mm camera with manual aperture control. Some wide zooms may work as well.
- An adapter for reverse mounting of your lens to your DSLR body
- A tripod
- A well lit surface for placing your razor such as a kitchen counter top
- Patience and will to experiment
Camera[edit | edit source]
Any DSLR camera with a support for manual focus lenses should work as long as you can get a reverse adapter for it. Author uses a 4/3rds Panasonic DMC-L1 but most (if not all) DSLRs should work (except for those dumbed-down by their manufacturer to force you to use their expensive auto focus lenses). Author highly recommends cameras with Live view as they make focusing easy and that can also work as high magnification microscopes.
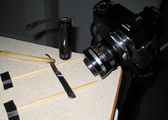
Author's rig. Camera on tripod, lens attached via two adapters, chopsticks for laying the razor flat, a LED flashlight for illumination.

Lens[edit | edit source]
High magnification macro pictures can be taken with reverse mounted fixed focal length lenses. The general rule of thumb is: the shorter the focal length of the lens is, the higher the magnification but also the narrower the depth of field and the closer the focus distance (too wide == too close to the lens). Usable focal length range is typically between 25-50mm (in 35mm format terms). The lens should have a manual aperture control as it can not be electrically linked to a camera. Note that as the mounting is done via the lens's filter thread, it does not have to be from the same manufacturer as the camera.
Author uses a f=29mm vintage Exakta lens (Meyer Görlitz Orestegon 2.8/29) on a 4/3rds body. This combination yields magnification demonstrated below.
1mm ticks on a plastic ruler. Highest magnification of my rig (click to see full size).
Total 4mm in 1mm ticks on a ruler. Lens stopped down to f/16.


Hidden bonus: you can use the same lens for direct observation of edges during honing. They are better than many cheap microscopes out there.
Adapter[edit | edit source]
Adapters for reverse mounting of lenses are readily available on 'bay for less than $10 (see http://shop.ebay.com/i.html?_nkw=reverse+lens+adapter). They mount lenses via their front filter thread so make sure you have a match against your camera body AND against the filter size of your lens. Author uses a combination of two adapters - a filter thread to Exakta body adapter and an Exakta lens to 4/3rds body adapter to mount the Orestegon to the L1.
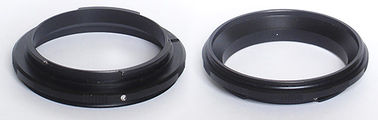
52mm filter-to-EOS mount adapter for Canon cameras.

Tripod[edit | edit source]
A solid tripod is a must. Slightest camera vibrations will ruin your pictures. You can use anything that lets you place the camera near a counter top or any other well lit surface where the razors will be placed.
Well lit surface[edit | edit source]
Obviously, anything works as long as the place is well lit and the razor is safe. Keep in mind that variations in lighting will make it impossible to compare a series of pictures. With fixed light, your changes of repeating the exact lighting conditions may be higher. Note that the relative position of the edge vs. the light source has tremendous impact on the final images, see below.
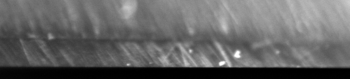
Example of badly chosen light position.

Same edge, same magnification, better lighting angle.


Hint: It is better to have dark background against the edge.
Taking Pictures[edit | edit source]
Here is an example just for your entertainment and inspiration. You are a skilled photographer and so you will likely figure out a better method quickly.:)
Mount the lens to the camera via the reverse adapter. Switch your camera to a mode that allows use of manual focus lenses and switch on the live view if available. Place the camera on a tripod and place it near the counter top. Place a sheet of newspaper on the counter top and play with the tripod and the camera (position, angles, distance) until you get a straight and well focused picture of the newspaper in the viewfinder or on the LCD. Place the razor edge near the center of focus and re-adjust the camera and razor positions until you get a well focused image of the edge. Mind how the razor's edge is lit. You will have to focus with distance - with moving the edge forth and back. It can be confusing initially but one gets used to it quickly. When well focused, take the picture but make sure you do not shake or move the camera (remote shutter release or self-time use is HIGHLY recommended). Feel free to experiment with apertures, the smaller the aperture the larger the DOF but also the longer the exposure.
When everything goes as planned, you should be getting pictures like those in this page or better.

Razor bevel with human hair. Green channel, resized, sharpened.

Post-processing[edit | edit source]
In order to achieve maximum sharpness, author recommend shooting raw or highest quality jpg files and post-processing them in your favorite editor. Author has been using Picture Window Pro with excellent results for years (inexpensive, works with 16bpc, can process very very very large files (i.e. large scans of 8x10 negatives) and does not require big hardware). You will need crop, resize, brightness curve and sharpness adjustments.
Hint: toss the RGB and work with grayscale only. Author's preferred method is using the green channel as it has usually the least noise (a trick learned when working with scanners).
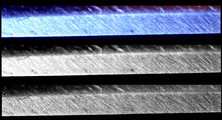
Original RGB picture, green channel, red channel.

Using Camera as a Microscope[edit | edit source]
In order to be able to see the magnified picture on the camera LCD instead of in the viewfinder, the camera needs to have Live view. Switch it on and use the "digital zoom" for highest magnification (if your camera is equipped with one). It works very well on author's DMC-L1.
Troubleshooting[edit | edit source]
Under construction
Geometry, calculations, magnification[edit | edit source]
Under constructions. Volunteers are welcome. :)
Gallery[edit | edit source]
Progression of coarse to fine natural hones[edit | edit source]
An edge honed on aoto, aoto slurry on C12K, washita, coticule with slurry. Each picture was taken after several dozens of laps on each stone when swarf was clearly detectable in slurry. Author tried to take a picture of the same section of an edge and marked the blade with a black marker. He had, however, re-draw the mark quite often, hence the fit is not 100% perfect.
Click on the pictures for high resolution versions.

Edge before honing.

Edge after author's (questionable quality) aoto. Notice the chips.

Edge after C12K w/aoto slurry. Chips almost removed.

Edge after a stone that author guesses is a washita.

Edge after a coticule w/ heavy slurry. Polishing very noticeable compared to previous hones.

Edge after a BBW w/ slurry.

Edge after a three dozens of laps on coticule w/ water only.

Edge after several dozens of laps on Charnley forest w/ water and detergent.


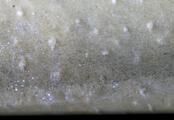
Surfaces of natural hones[edit | edit source]
Pictures of surfaces of hones used in the previous progression.
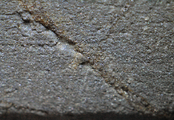
Surface of author's Aoto (this is what it looks like after several dozens of laps).
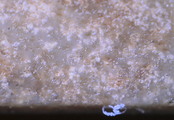
Surface of a hone that author guesses is a Washita stone.
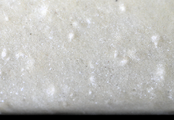
Surface of author's Coticule (perhaps one from the La Petite Blanche layer?). The white "bumps" form the typical pattern on the surface.
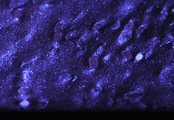
Surface of author's Belgian Blue Whetstone (BBW).
Coticule with swarf after honing w/ water only.
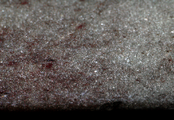
Surface of author's Charnley Forest.


Discussion, comments[edit | edit source]
Please add your comments, complaints, experience and links to your pictures to the discussion page of this article.
Acknowledgements[edit | edit source]
This article was written by Sparq (a.k.a "Author")