Difference between revisions of "Making a brush with no lathe"
| (11 intermediate revisions by 2 users not shown) | |||
| Line 1: | Line 1: | ||
| − | Hey everyone, I have made a few brushes recently, but I never take many pictures. So this time, I decided to have my brother take some shots while I made a brush. Hopefully this will give some insight for those who want to try their hand at brush-making. That being said, I do not have a lathe, so I'll show you what I do to get around this (and I would still probably have the most fun doing it this way anyhow). | + | Hey everyone, I have made a few brushes recently, but I never take many pictures. So this time, I decided to have my brother take some shots while I made a brush. Hopefully this will give some insight for those who want to try their hand at brush-making. That being said, I do not have a lathe, so I'll show you what I do to get around this (and I would still probably have the most fun doing it this way anyhow). So here we go: |
| − | |||
| − | |||
| − | |||
| + | == Sketching == | ||
First I will admit that some steps are missing, but I'll do what I can to make up for it with explanation. | First I will admit that some steps are missing, but I'll do what I can to make up for it with explanation. | ||
| − | The first thing that I do when making a brush is to get out some paper and start sketching. Graph paper can really help with scaling so that you can pick your knot size, allow for the knot hole, and draw whatever design looks cool to you. | + | The first thing that I do when making a brush is to get out some paper and start sketching. Graph paper can really help with scaling so that you can pick your knot size, allow for the knot hole, and draw whatever design looks cool to you. |
| − | |||
| − | |||
| − | |||
| − | While I am thinking up designs, I also try to imagine what kind of wood (I always use wood for my projects, just my preference) would look good with my design. For this brush, I decided to go with a redwood burl. | + | <gallery caption="" widths="350px" heights="350px" perrow="2"> |
| + | Image:CJbrush.jpg|Here is what I started with. | ||
| + | Image:Redwood_lace_burl1.jpg | While I am thinking up designs, I also try to imagine what kind of wood (I always use wood for my projects, just my preference) would look good with my design. For this brush, I decided to go with a redwood lace burl. | ||
| + | </gallery> | ||
| − | + | == Drilling the knot hole == | |
| − | + | Next, I cut off an appropriate sized block and drill out the knot hole. ''It is important to make sure that your block is square, and that you clamp it securely to a level drill press table. The forstner bits you'll use for the knot holes can really grab a piece of wood if you are not careful.'' Sorry, I didn't get pictures of this for this particular brush, so I'll recycle one from another project. | |
| − | + | <gallery caption="" widths="350px" heights="350px" perrow="2"> | |
| − | + | Image:Drill.JPG| Next, I cut off an appropriate sized block and drill out the knot hole. | |
| − | + | </gallery> | |
| − | |||
| − | Next, I cut off an appropriate sized block and drill out the knot hole. | ||
| − | |||
After I have a block cut, and a hole drilled, I like to do a quick test fit with the knot in order to make sure that there are no irregularities that need to be dealt with. | After I have a block cut, and a hole drilled, I like to do a quick test fit with the knot in order to make sure that there are no irregularities that need to be dealt with. | ||
| − | Next, I transfer a rough version of my design to the block, leaving plenty of room for error. | + | Next, I transfer a rough version of my design to the block, leaving plenty of room for error.--sorry, no pic-- |
| − | + | == Cutting out the side profile of the design== | |
| − | + | Once my design is on the block, I use a coping saw to cut out the side profile of the design. | |
| − | + | <gallery caption="" widths="350px" heights="350px" perrow="2"> | |
| + | Image:Rough_coping_shape.jpg| Here you can see the block after the coping cut, but before any further shaping. | ||
| + | Image:Carve_design.jpg|Now, I like to draw the front and back design onto the block, but this is just to be used as a reference point once shaping begins. | ||
| + | </gallery> | ||
| − | I | + | ==Shaping Time!== |
| + | Now I have done this a few times with hand rasps and sandpaper, but a Dremel with carbide rasp tip works really well too. In this tutorial I will show you how I shape with a Dremel. ''Always use eye protection and a respirator, it isn't worth taking a shortcut with safety''.<ref>[[Safety_tips| Safety tips]] and [[Toxic_Woods|Toxic woods]]</ref> | ||
| − | Then I just keep shaping | + | <gallery caption="" widths="300px" heights="350px" perrow="3"> |
| + | Image:Shaping1.jpg|I start with shaping the hard edges down to the lines I have drawn. | ||
| + | Image:Shaping_3.jpg|Then I just keep shaping and shaping until... | ||
| + | Image:Carveshaperough.JPG|I have a decent looking shape. | ||
| + | </gallery> | ||
| − | + | Then I switch to a sanding drum to smooth out the rasp marks (make sure not to go so far with the rasps that you can't take out the marks without ruining the brush). I also do all detail carving with a sanding tip, ''not'' a rasp. I think the rasp would do too much too quickly. | |
| − | + | <gallery caption="" widths="300px" heights="350px" perrow="2"> | |
| + | Image:Ready_for_sanding.JPG| Here is the brush shape... | ||
| + | Image:Test_fit.JPG| after the drum sanding. | ||
| + | </gallery> | ||
| − | + | ==Smoothing the surfaces and applying the finish== | |
| + | Now I hand file and sand to make sure that all of the shaping marks are taken out, and that the surfaces are smooth. I start with a 150 grit, then go to 220. Usually if I'm using a clear coat type finish (polyurethane, epoxy, etc.) I don't go much higher than 220, sometimes I will use 320, but no higher. These finishes need something to hold on to. If I am going to use an oil finish I will go to 600 grit or so. For this brush, I used an epoxy finish. I am really starting to believe that epoxy (or CA) is the way to go because of the durability and water resistance, but that is a whole different issue. For this finish, I mixed the epoxy, then I brushed the epoxy on. (Notice that I put a screw in the knot hole so that I could hold the brush by the screw while applying the finish, then hang the brush to dry.) | ||
| − | + | The entire process isn't pictured here, but I'll tell you what I did. | |
| + | # After sanding, I wiped down the brush with acetone, then applied a coat of epoxy cut with acetone (equal parts) to act as a seal coat and let it dry for 6 hours. | ||
| + | # I lightly sanded the brush with 220 grit, then quickly wiped the brush with acetone. | ||
| + | # I applied a full strength coat of epoxy with a small brush, taking care to cover the entire brush. | ||
| + | # I quickly passed a torch (a BBQ lighter works too) over the finish where any bubbles showed up in the finish. | ||
| + | # The brush was hung to dry for 24 hours | ||
| − | + | <gallery caption="Some pictures of the result" widths="350px" heights="350px" perrow="2"> | |
| − | + | Image:Finish_1coat.JPG| | |
| + | Image: Finish_hang.JPG| | ||
| + | </gallery> | ||
| − | + | ==Finishing the finish== | |
| − | + | After the first full coat, I checked for any residual bubbles, sanded with 220, then followed the process from step 3 on. When the finish sets with this method, you will need to sand the bottom most point of the finish even with the rest of the finish, it will build up at the point where it drips. Once the finish was dry for a full 48 hours, I used 1000 grit sandpaper and extra fine steel wool to smooth out the finish, and to take off the gloss (my preference is for flatter finishes). | |
| + | <gallery caption="" widths="350px" heights="350px" perrow="2"> | ||
| + | Image:Back_close_up.jpg |After all of the finish smoothing, I used some polishing wax (most auto wax works) to buff out the final finish. | ||
| + | </gallery> | ||
| − | the | + | == Finale: Glueing in the knot == |
| − | + | Once I was satisfied with the finish, I glued in the knot with marine epoxy, making sure to mix the epoxy very well before putting it in the knot hole. Then I inserted the badger knot while giving a twist to make sure that the knot seated well. After 24 hours, the brush is ready to go. | |
| − | |||
| − | |||
| − | |||
| − | |||
| − | + | <gallery caption="" widths="300px" heights="350px" perrow="3"> | |
| + | Image:Front.jpg| | ||
| + | Image:Side.jpg| | ||
| + | Image:Back.jpg| | ||
| + | </gallery> | ||
| − | + | Hope this helped, or at least was a decent read. | |
| − | |||
| − | |||
| − | |||
| − | |||
| + | Dave | ||
| − | + | == References == | |
| − | + | <references /> | |
| − | + | [[Category:Do It Yourself]] | |
| − | |||
| − | |||
Latest revision as of 13:11, 8 January 2010
Hey everyone, I have made a few brushes recently, but I never take many pictures. So this time, I decided to have my brother take some shots while I made a brush. Hopefully this will give some insight for those who want to try their hand at brush-making. That being said, I do not have a lathe, so I'll show you what I do to get around this (and I would still probably have the most fun doing it this way anyhow). So here we go:
Contents
Sketching[edit | edit source]
First I will admit that some steps are missing, but I'll do what I can to make up for it with explanation.
The first thing that I do when making a brush is to get out some paper and start sketching. Graph paper can really help with scaling so that you can pick your knot size, allow for the knot hole, and draw whatever design looks cool to you.
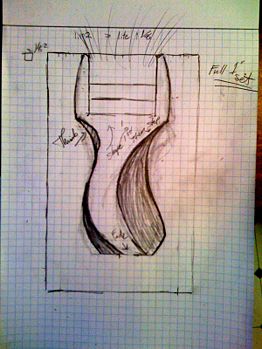
Here is what I started with.
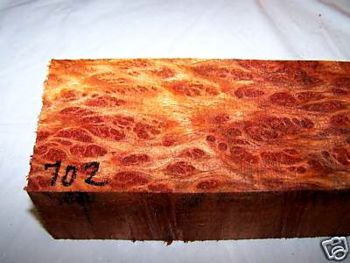
While I am thinking up designs, I also try to imagine what kind of wood (I always use wood for my projects, just my preference) would look good with my design. For this brush, I decided to go with a redwood lace burl.


Drilling the knot hole[edit | edit source]
Next, I cut off an appropriate sized block and drill out the knot hole. It is important to make sure that your block is square, and that you clamp it securely to a level drill press table. The forstner bits you'll use for the knot holes can really grab a piece of wood if you are not careful. Sorry, I didn't get pictures of this for this particular brush, so I'll recycle one from another project.
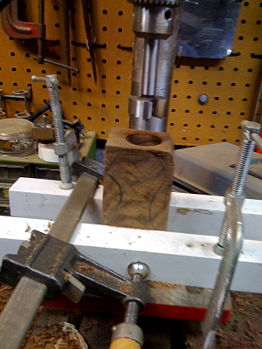
Next, I cut off an appropriate sized block and drill out the knot hole.

After I have a block cut, and a hole drilled, I like to do a quick test fit with the knot in order to make sure that there are no irregularities that need to be dealt with.
Next, I transfer a rough version of my design to the block, leaving plenty of room for error.--sorry, no pic--
Cutting out the side profile of the design[edit | edit source]
Once my design is on the block, I use a coping saw to cut out the side profile of the design.
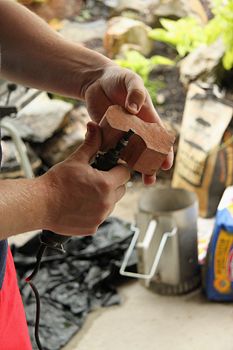
Here you can see the block after the coping cut, but before any further shaping.
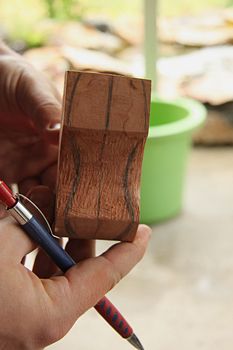
Now, I like to draw the front and back design onto the block, but this is just to be used as a reference point once shaping begins.


Shaping Time![edit | edit source]
Now I have done this a few times with hand rasps and sandpaper, but a Dremel with carbide rasp tip works really well too. In this tutorial I will show you how I shape with a Dremel. Always use eye protection and a respirator, it isn't worth taking a shortcut with safety.[1]
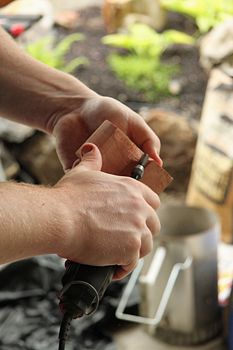
I start with shaping the hard edges down to the lines I have drawn.
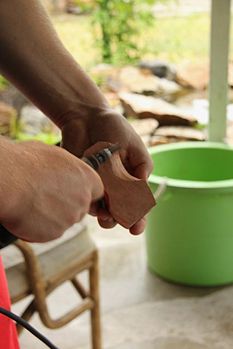
Then I just keep shaping and shaping until...
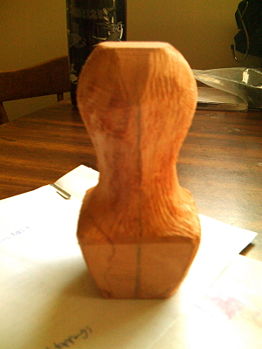
I have a decent looking shape.


Then I switch to a sanding drum to smooth out the rasp marks (make sure not to go so far with the rasps that you can't take out the marks without ruining the brush). I also do all detail carving with a sanding tip, not a rasp. I think the rasp would do too much too quickly.
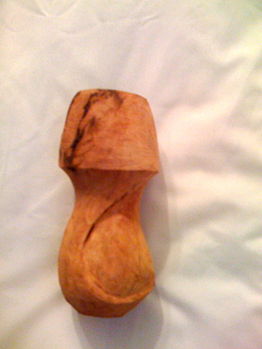
Here is the brush shape...

after the drum sanding.


Smoothing the surfaces and applying the finish[edit | edit source]
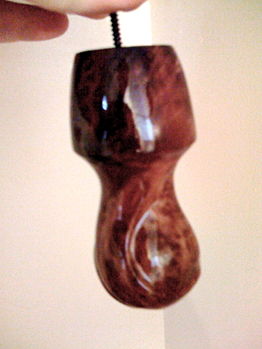
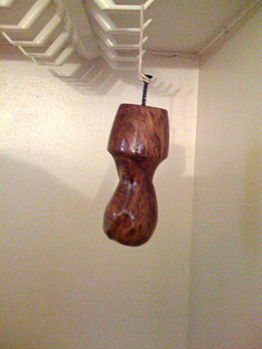
Now I hand file and sand to make sure that all of the shaping marks are taken out, and that the surfaces are smooth. I start with a 150 grit, then go to 220. Usually if I'm using a clear coat type finish (polyurethane, epoxy, etc.) I don't go much higher than 220, sometimes I will use 320, but no higher. These finishes need something to hold on to. If I am going to use an oil finish I will go to 600 grit or so. For this brush, I used an epoxy finish. I am really starting to believe that epoxy (or CA) is the way to go because of the durability and water resistance, but that is a whole different issue. For this finish, I mixed the epoxy, then I brushed the epoxy on. (Notice that I put a screw in the knot hole so that I could hold the brush by the screw while applying the finish, then hang the brush to dry.)
The entire process isn't pictured here, but I'll tell you what I did.
- After sanding, I wiped down the brush with acetone, then applied a coat of epoxy cut with acetone (equal parts) to act as a seal coat and let it dry for 6 hours.
- I lightly sanded the brush with 220 grit, then quickly wiped the brush with acetone.
- I applied a full strength coat of epoxy with a small brush, taking care to cover the entire brush.
- I quickly passed a torch (a BBQ lighter works too) over the finish where any bubbles showed up in the finish.
- The brush was hung to dry for 24 hours
- Some pictures of the result


Finishing the finish[edit | edit source]
After the first full coat, I checked for any residual bubbles, sanded with 220, then followed the process from step 3 on. When the finish sets with this method, you will need to sand the bottom most point of the finish even with the rest of the finish, it will build up at the point where it drips. Once the finish was dry for a full 48 hours, I used 1000 grit sandpaper and extra fine steel wool to smooth out the finish, and to take off the gloss (my preference is for flatter finishes).
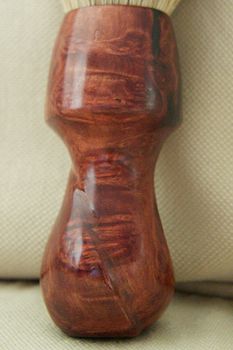
After all of the finish smoothing, I used some polishing wax (most auto wax works) to buff out the final finish.

Finale: Glueing in the knot[edit | edit source]
Once I was satisfied with the finish, I glued in the knot with marine epoxy, making sure to mix the epoxy very well before putting it in the knot hole. Then I inserted the badger knot while giving a twist to make sure that the knot seated well. After 24 hours, the brush is ready to go.


Hope this helped, or at least was a decent read.
Dave
References[edit | edit source]
- ↑ Safety tips and Toxic woods