Difference between revisions of "Pyramid honing guide"
m (Text replacement - "http://straightrazorpalace.com" to "https://straightrazorpalace.com") |
|||
| (39 intermediate revisions by 6 users not shown) | |||
| Line 1: | Line 1: | ||
| − | + | What is the pyramid method of honing? The theory behind the pyramid system is simple: You alternate between hones of two different grits, using a lot of strokes on the coarser side to start out, then using fewer and fewer as you continue. | |
| + | ''Note: The term "stroke" in this article implies 2 movements: one up the hone and one down, so that the blade returns to its starting point.'' | ||
| − | + | Usually, the pyramid is done on a Norton 4000/8000 grit combination stone. It is called a "pyramid" because the strokes on the coarse side of the stone taper off as you go: You might start with 10, for example, then 5, then 3, then 1.<ref>https://straightrazorpalace.com/basic-honing/23863-pyramid-honing-photo-tutorial.html#post232661</ref> | |
| − | + | As you progress in your honing abilities, you will develop theories as to why it works, but even some of the more advanced honers seem to disagree on the theory behind it. For right now, let is just say that it helps you avoid some of the vexing problems of honing and creates a clear path for you to follow. It helps you avoid the dreaded "overhoned edge," and it partially answers the question "how many strokes do I do?" | |
| − | Once you get to the | + | <br> |
| + | |||
| + | == Pyramid Honing: a howto guide == | ||
| + | |||
| + | The following guide was written by [https://straightrazorpalace.com/members/lynn.html Lynn Abrams]<ref>https://straightrazorpalace.com/basic-honing/39805-pyramid-honing.html</ref> | ||
| + | |||
| + | The main thing to remember is that it really helps to make sure you have a proper bevel on your razor before going to the pyramids. Do you have to? Not every time depending on the razor, but generally, it's really the best thing to do to help you get to that edge that will shave nicely. | ||
| + | |||
| + | Another thing about the pyramids is that they are basically guidelines and people have used them as they are with success as well as experimented and used similar methods with varying stroke counts that have worked for them. | ||
| + | |||
| + | Are pyramids a scientifically sound process based on laboratory testing along with basic honing, granular structure and metallurgy principles? Absolutely! I have conducted extreme analysis on pyramids and written at least 5 journals and 3 thesis papers on the subject. Pyramids are beyond any question an incremental process of improving a razors edge to shavability. Unfortunately, there was this fire and all my data was destroyed or I would be attaching it here for your scrutiny. Dang, I hate when that happens! | ||
| + | |||
| + | So, when I think pyramids and by the way, I didn't invent this process; it was taught to me by the first honemeister Don Walters. Oh yeah, pyramids. Here are the pyramids that I use for carbon razors: | ||
| + | |||
| + | {| border="1" cellpadding="5" cellspacing="0" align="center" | ||
| + | |- | ||
| + | ! style="background:#efefef;" | '''Strokes on Norton 4k''' | ||
| + | ! style="background:#efefef;" | '''Strokes on Norton 8k''' | ||
| + | |- | ||
| + | | 25 | ||
| + | | 25 | ||
| + | |- | ||
| + | | 20 | ||
| + | | 20 | ||
| + | |- | ||
| + | | 15 | ||
| + | | 15 | ||
| + | |- | ||
| + | | 10 | ||
| + | | 10 | ||
| + | |- | ||
| + | | 5 | ||
| + | | 5 | ||
| + | |- | ||
| + | | 3 | ||
| + | | 3 | ||
| + | |- | ||
| + | | 1 | ||
| + | | 3 | ||
| + | |- | ||
| + | | 1 | ||
| + | | 5 | ||
| + | |} | ||
| + | |||
| + | That is pretty much it. It is important to use basically just the pressure of the blade on the stone. I use an X stroke and try to make sure that I keep the blade very flat through out the stroke and make sure I keep the pressure even though out the stroke. Spine and edge of the razor on the stone with even pressure at all times. This does take a little practice, but usually can be picked up pretty easily. | ||
| + | |||
| + | I can use a 45 degree angle X stroke for blades with badly flattened or uneven spines, wedges and smiley or frowning blades and it seems to work very well as it helps keep the edge on the stone throughout the stroke. | ||
| + | |||
| + | No I don't start every razor at the top with 25 strokes. Normally I will work from 15 strokes down and sometimes try working from 10 strokes down on new razors. If you have a razor that seems like the bevel is OK, you can start at the 25 strokes, but usually if you think you need more, you should go ahead and go down to a 1K and set a new bevel. | ||
| + | |||
| + | ''Less strokes are better!'' | ||
| + | |||
| + | I have really enjoyed working with the Naniwa Super Stones lately and they offer some fun when using the pyramids. You can use either the 3K or the 5K in rotation with the 8K and they work very well with consistent and good results. I have been using the 3K for more the eBay type razors or those in a little rougher shape and using the 5K with nicer razors and full or extra hollow grinds.. | ||
| + | |||
| + | This process also works very well with the Shapton Glass 4K and 8K stones. | ||
| + | |||
| + | When I first learned this process, I learned it on a Norton Combo 4K/8K stone and have worn out the 4K side on 8 stones since that time. When I first started, I was shaving right off the 8K side and had fantastic results. This was before I discovered the natural finishing stones and then the pasting or spray media. On the new Nortons, I recommend lapping off about 1/8 of an inch of the 4K side to get past the grainy feeling the newer stones have. Once the 4K side starts to feel smooth to the touch, you are there. | ||
| + | |||
| + | When we talk about lapping the stones, I really lap more to make sure I get the swarf off the stones and clean them up for the next use more than I am concerned with a millionth degree of flatness. Mostly flat is usually all you need to hone your razor so long as the edge and spine remain on the stone throughout your stroke. OK purists, don't get upset, as flat as you can get the stone is not a bad thing either. I have seen many a dished out or bowed hone from the old days and people were using them and shaving. I was using a pumice stone before Norton came out with the flattening stone and needles to say my stones were not perfectly flat, but I honed thousands of razor that were great shavers without difficulty. | ||
| + | |||
| + | The only real variation to the pyramid that I do is toward the end of the process on stainless razors or the newer harder feeling type steel razors. The variation starts at the 3 stroke level. | ||
| + | |||
| + | {| border="1" cellpadding="5" cellspacing="0" align="center" | ||
| + | |- | ||
| + | ! style="background:#efefef;" | '''Strokes on Norton 4k''' | ||
| + | ! style="background:#efefef;" | '''Strokes on Norton 8k''' | ||
| + | |- | ||
| + | | 3 | ||
| + | | 5 | ||
| + | |- | ||
| + | | 1 | ||
| + | | 7 | ||
| + | |- | ||
| + | | 1 | ||
| + | | 7 | ||
| + | |} | ||
| + | |||
| + | I find that these razors do better with more polishing strokes. | ||
| + | |||
| + | The pretty much sums up the pyramid method that I use. With a little practice, this is a very consistent and repeatable process and once learned can really lay the foundation for experimenting with various other honing techniques. | ||
| + | |||
| + | == Pyramid Honing: a photo tutorial using Norton hones == | ||
| + | |||
| + | The following guide was written by [https://straightrazorpalace.com/members/joshearl.html JoshEarl]<ref>https://straightrazorpalace.com/basic-honing/23863-pyramid-honing-photo-tutorial.html</ref> | ||
| + | |||
| + | <gallery widths="400px" heights="267px" perrow="2"> | ||
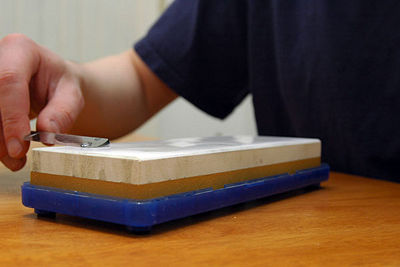
| + | Image:Pyramid_Honing-_A_Photo_Tutorial_by_Josh_Earl_-_DSC_4325.JPG |Here's a shot of all my honing equipment. The tub of water is to soak the Norton combo hone. You need to soak it for about 15 minutes before honing to allow the water to permeate the 4K side of the hone. Those steel plates are DMT diamond hones, 325 grit and 1200 grit. I use the 325-grit hone for lapping, and the 1200-grit one for dealing with chipped edges. The green cloth is a cheap microfiber cloth from Wal-Mart. These are great for drying off the blade to check on the edge. I use the spray bottle to mist the surface of the hone with water as I go. | ||
| + | Image:Pyramid_Honing-_A_Photo_Tutorial_by_Josh_Earl_-_DSC_4327.JPG |After allowing the Norton to soak for 15 minutes or so, until bubbles stop coming out of it, it's time to lap it. Lapping is done to flatten and clean the hone. I've also done a [[Hone_Lapping_101 |lapping photo tutorial]]. I'm lapping this hone with my 325-grit DMT hone, which is fast and not too messy. The running water keeps the DMT from clogging. A freshly lapped hone is a joy to use. The surfaces are smooth and cut efficiently. | ||
| + | Image:Pyramid_Honing-_A_Photo_Tutorial_by_Josh_Earl_-_DSC_4335.JPG|Holding the razor properly is important. I find that I get the best results if I hold the shank of the razor lightly between my thumb and first two fingers. Keep your fingers on the sides of the shank, not gripping the top and bottom. You want to pull and push the razor along the surface, not press the blade down into the hone. My ring finger and pinky curl under the scales, lightly supporting them during the stroke. | ||
| + | Image:Pyramid_Honing-_A_Photo_Tutorial_by_Josh_Earl_-_DSC_4329.JPG | This photo shows the posture I use when honing. I struggled a lot when I was starting out until I got Lynn's DVD and copied his posture. Position the hone so that it points away from your body. I find that it's much easier to keep the razor flat on the hone when your strokes are going toward and away from you, instead of side to side. Honing seated is better than trying to stand, because your face is closer to your hands and you can see what you're doing better. Also, you'll probably be doing this for a while, and if you try to stand you'll get tired before your razor gets sharp. Notice how my elbow is held up off the table. Keeping your elbow up allows you to make even, smooth strokes. | ||
| + | Image:Pyramid_Honing-_A_Photo_Tutorial_by_Josh_Earl_-_DSC_4339.JPG |Notice that I'm only using one hand. Some guys do quite well using two hands, but most find that it's easier to get consistent results using one. | ||
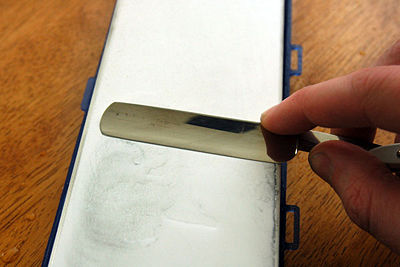
| + | Image:Pyramid_Honing-_A_Photo_Tutorial_by_Josh_Earl_-_DSC_4340.JPG |I recommend using an X-pattern stroke. To do an X stroke, you start with the whole blade on the hone, and as you draw the razor across the surface of the hone, you make a diagonal line with the tip of the razor. | ||
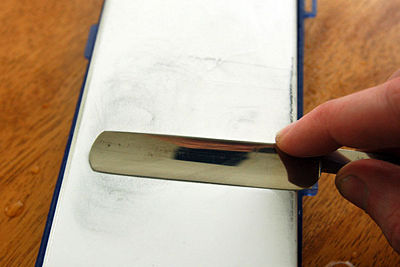
| + | Image:Pyramid_Honing-_A_Photo_Tutorial_by_Josh_Earl_-_DSC_4341.JPG |The heel of the razor comes off the hone, and you end the stroke with only 1/3 of the blade resting on the hone. | ||
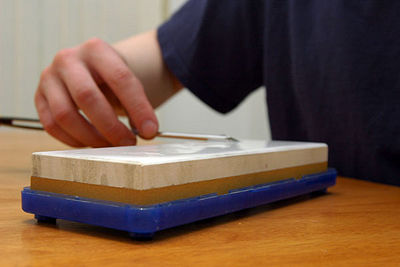
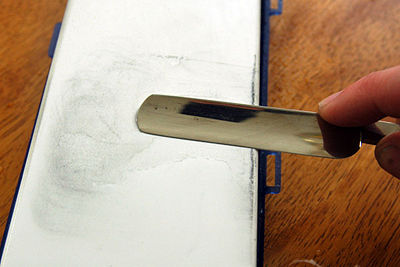
| + | Image:Pyramid_Honing-_A_Photo_Tutorial_by_Josh_Earl_-_DSC_4342.JPG |Repeating the diagonal on the away stroke makes an X. | ||
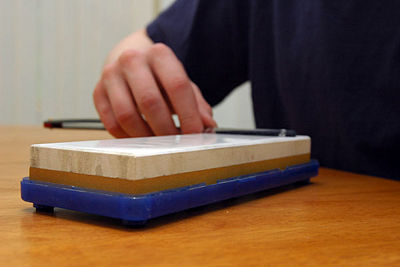
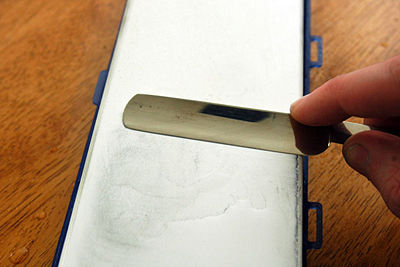
| + | Image:Pyramid_Honing-_A_Photo_Tutorial_by_Josh_Earl_-_DSC_4344.JPG |... | ||
| + | Image:Pyramid_Honing-_A_Photo_Tutorial_by_Josh_Earl_-_DSC_4345.JPG |See? | ||
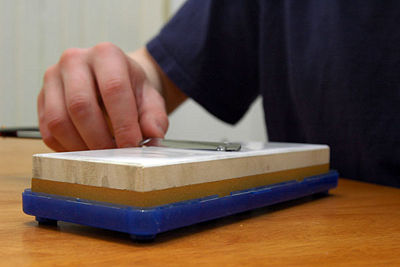
| + | Image:Pyramid_Honing-_A_Photo_Tutorial_by_Josh_Earl_-_DSC_4333.JPG | Two critical points to remember during each stroke: 1) Use light, even strokes. 2) Keep the blade flat on the hone, with both the edge and the spine touching at all times. Bearing down on the razor with a lot of pressure will damage the delicate edge you're trying to create. The spine is a built-in angle guide, allowing you to keep the exact same angle on each stroke. | ||
| + | Image:Pyramid_Honing-_A_Photo_Tutorial_by_Josh_Earl_-_DSC_4332.JPG | You begin the pyramid by honing on the 4000-grit side of the hone, which is the white side.We're just touching up a razor that's already pretty sharp, so we'll do a conservative pyramid. I do one X-pattern lap on the 4K side. A lap includes a stroke in each direction--forward and back--so both sides of the razor are getting honed equally. | ||
| + | Image:Pyramid_Honing-_A_Photo_Tutorial_by_Josh_Earl_-_DSC_4331.JPG | As I hone, the water soaks into the stone, so I keep misting the water on. You want to keep a puddle of water on top of the hone. | ||
| + | Image:Pyramid_Honing-_A_Photo_Tutorial_by_Josh_Earl_-_DSC_4346.JPG |I flip the hone over... | ||
| + | Image:Pyramid_Honing-_A_Photo_Tutorial_by_Josh_Earl_-_DSC_4348.JPG |mist on some more water... | ||
| + | Image:Pyramid_Honing-_A_Photo_Tutorial_by_Josh_Earl_-_DSC_4349.JPG |and do five X-strokes... | ||
| + | Image:Pyramid_Honing-_A_Photo_Tutorial_by_Josh_Earl_-_DSC_4350.JPG |on the yellow 8000-grit side. | ||
| + | Image:Pyramid_Honing-_A_Photo_Tutorial_by_Josh_Earl_-_DSC_4359.JPG |I work my way through the rest of the pyramid: One stroke on the 4K, flip, five on the 8K. Three strokes on the 4K, flip, five on the 8K. Five strokes on the 4K, flip, five strokes on the 8K. Three strokes on the 4K, flip, five on the 8K. One stroke on the 4K, flip, five on the 8K. One stroke on the 4K, flip, five on the 8K. The last 1-5 steps require paying close attention to keeping the pressure light and the blade flat on the hone. The edge is very delicate at this stage, and you can damage it if you're not careful. One good clue to watch is the way the water responds to the razor. When the blade is flat, the edge will push a ripple of water in front of it. | ||
| + | Image:Pyramid_Honing-_A_Photo_Tutorial_by_Josh_Earl_-_DSC_4368.JPG |That's all there is to it. Well, that and a bit of practice. This razor is ready for a test shave. | ||
| + | Image:Pyramid_Honing-_A_Photo_Tutorial_by_Josh_Earl_-_DSC_4370.JPG |One other technique that I wanted to mention is circular honing. | ||
| + | Image:Pyramid_Honing-_A_Photo_Tutorial_by_Josh_Earl_-_DSC_4371.JPG |If you have a razor that has some bad damage to the edge, like a chip or ding, circular honing on the 4K can help you work out the damage quickly. | ||
| + | Image:Pyramid_Honing-_A_Photo_Tutorial_by_Josh_Earl_-_DSC_4372.JPG |Do do a circular honing stroke, lay the blade flat on the hone. Press down firmly and move the blade in small circles. Do maybe 10 or 20, then flip the blade over and repeat on the other side. The extra pressure and circular motions remove steel much faster than an X-pattern stroke. | ||
| + | </gallery> | ||
| + | |||
| + | == See also == | ||
| + | |||
| + | *Different strokes for honing a razor are explained in [[Strokes for honing a razor]]. | ||
| + | *The sharpness tests mentioned in this article are explained in more detail in [[Sharpness tests explained]]. | ||
| + | |||
| + | |||
| + | |||
| + | |||
| + | == References == | ||
| + | |||
| + | <u><u></u> | ||
| + | |||
| + | <u><references /></u> | ||
| − | |||
[[Category:Honing]] | [[Category:Honing]] | ||
Latest revision as of 10:48, 17 February 2018
What is the pyramid method of honing? The theory behind the pyramid system is simple: You alternate between hones of two different grits, using a lot of strokes on the coarser side to start out, then using fewer and fewer as you continue.
Note: The term "stroke" in this article implies 2 movements: one up the hone and one down, so that the blade returns to its starting point.
Usually, the pyramid is done on a Norton 4000/8000 grit combination stone. It is called a "pyramid" because the strokes on the coarse side of the stone taper off as you go: You might start with 10, for example, then 5, then 3, then 1.[1]
As you progress in your honing abilities, you will develop theories as to why it works, but even some of the more advanced honers seem to disagree on the theory behind it. For right now, let is just say that it helps you avoid some of the vexing problems of honing and creates a clear path for you to follow. It helps you avoid the dreaded "overhoned edge," and it partially answers the question "how many strokes do I do?"
Contents
Pyramid Honing: a howto guide[edit | edit source]
The following guide was written by Lynn Abrams[2]
The main thing to remember is that it really helps to make sure you have a proper bevel on your razor before going to the pyramids. Do you have to? Not every time depending on the razor, but generally, it's really the best thing to do to help you get to that edge that will shave nicely.
Another thing about the pyramids is that they are basically guidelines and people have used them as they are with success as well as experimented and used similar methods with varying stroke counts that have worked for them.
Are pyramids a scientifically sound process based on laboratory testing along with basic honing, granular structure and metallurgy principles? Absolutely! I have conducted extreme analysis on pyramids and written at least 5 journals and 3 thesis papers on the subject. Pyramids are beyond any question an incremental process of improving a razors edge to shavability. Unfortunately, there was this fire and all my data was destroyed or I would be attaching it here for your scrutiny. Dang, I hate when that happens!
So, when I think pyramids and by the way, I didn't invent this process; it was taught to me by the first honemeister Don Walters. Oh yeah, pyramids. Here are the pyramids that I use for carbon razors:
| Strokes on Norton 4k | Strokes on Norton 8k |
|---|---|
| 25 | 25 |
| 20 | 20 |
| 15 | 15 |
| 10 | 10 |
| 5 | 5 |
| 3 | 3 |
| 1 | 3 |
| 1 | 5 |
That is pretty much it. It is important to use basically just the pressure of the blade on the stone. I use an X stroke and try to make sure that I keep the blade very flat through out the stroke and make sure I keep the pressure even though out the stroke. Spine and edge of the razor on the stone with even pressure at all times. This does take a little practice, but usually can be picked up pretty easily.
I can use a 45 degree angle X stroke for blades with badly flattened or uneven spines, wedges and smiley or frowning blades and it seems to work very well as it helps keep the edge on the stone throughout the stroke.
No I don't start every razor at the top with 25 strokes. Normally I will work from 15 strokes down and sometimes try working from 10 strokes down on new razors. If you have a razor that seems like the bevel is OK, you can start at the 25 strokes, but usually if you think you need more, you should go ahead and go down to a 1K and set a new bevel.
Less strokes are better!
I have really enjoyed working with the Naniwa Super Stones lately and they offer some fun when using the pyramids. You can use either the 3K or the 5K in rotation with the 8K and they work very well with consistent and good results. I have been using the 3K for more the eBay type razors or those in a little rougher shape and using the 5K with nicer razors and full or extra hollow grinds..
This process also works very well with the Shapton Glass 4K and 8K stones.
When I first learned this process, I learned it on a Norton Combo 4K/8K stone and have worn out the 4K side on 8 stones since that time. When I first started, I was shaving right off the 8K side and had fantastic results. This was before I discovered the natural finishing stones and then the pasting or spray media. On the new Nortons, I recommend lapping off about 1/8 of an inch of the 4K side to get past the grainy feeling the newer stones have. Once the 4K side starts to feel smooth to the touch, you are there.
When we talk about lapping the stones, I really lap more to make sure I get the swarf off the stones and clean them up for the next use more than I am concerned with a millionth degree of flatness. Mostly flat is usually all you need to hone your razor so long as the edge and spine remain on the stone throughout your stroke. OK purists, don't get upset, as flat as you can get the stone is not a bad thing either. I have seen many a dished out or bowed hone from the old days and people were using them and shaving. I was using a pumice stone before Norton came out with the flattening stone and needles to say my stones were not perfectly flat, but I honed thousands of razor that were great shavers without difficulty.
The only real variation to the pyramid that I do is toward the end of the process on stainless razors or the newer harder feeling type steel razors. The variation starts at the 3 stroke level.
| Strokes on Norton 4k | Strokes on Norton 8k |
|---|---|
| 3 | 5 |
| 1 | 7 |
| 1 | 7 |
I find that these razors do better with more polishing strokes.
The pretty much sums up the pyramid method that I use. With a little practice, this is a very consistent and repeatable process and once learned can really lay the foundation for experimenting with various other honing techniques.
Pyramid Honing: a photo tutorial using Norton hones[edit | edit source]
The following guide was written by JoshEarl[3]
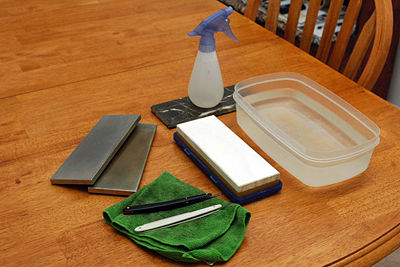
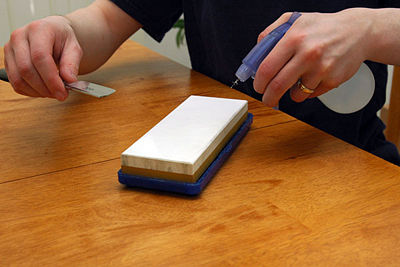
Here's a shot of all my honing equipment. The tub of water is to soak the Norton combo hone. You need to soak it for about 15 minutes before honing to allow the water to permeate the 4K side of the hone. Those steel plates are DMT diamond hones, 325 grit and 1200 grit. I use the 325-grit hone for lapping, and the 1200-grit one for dealing with chipped edges. The green cloth is a cheap microfiber cloth from Wal-Mart. These are great for drying off the blade to check on the edge. I use the spray bottle to mist the surface of the hone with water as I go.

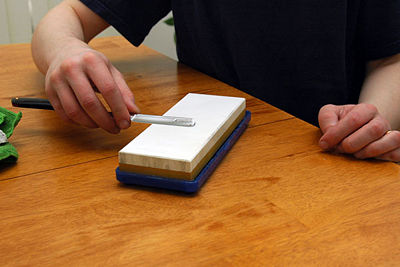
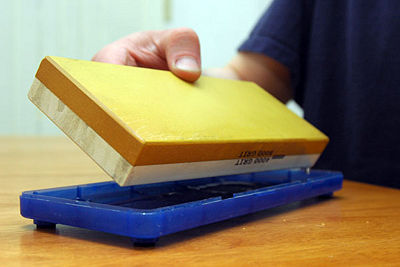
After allowing the Norton to soak for 15 minutes or so, until bubbles stop coming out of it, it's time to lap it. Lapping is done to flatten and clean the hone. I've also done a lapping photo tutorial. I'm lapping this hone with my 325-grit DMT hone, which is fast and not too messy. The running water keeps the DMT from clogging. A freshly lapped hone is a joy to use. The surfaces are smooth and cut efficiently.
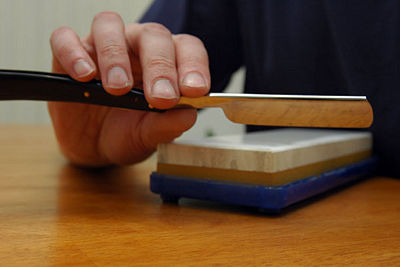
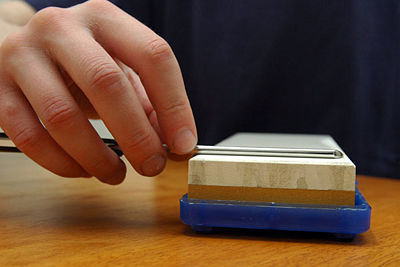
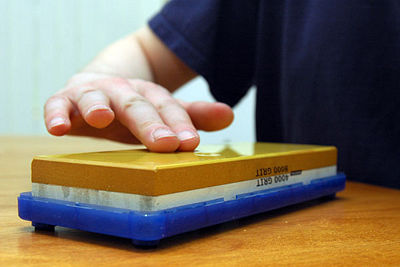
Holding the razor properly is important. I find that I get the best results if I hold the shank of the razor lightly between my thumb and first two fingers. Keep your fingers on the sides of the shank, not gripping the top and bottom. You want to pull and push the razor along the surface, not press the blade down into the hone. My ring finger and pinky curl under the scales, lightly supporting them during the stroke.
This photo shows the posture I use when honing. I struggled a lot when I was starting out until I got Lynn's DVD and copied his posture. Position the hone so that it points away from your body. I find that it's much easier to keep the razor flat on the hone when your strokes are going toward and away from you, instead of side to side. Honing seated is better than trying to stand, because your face is closer to your hands and you can see what you're doing better. Also, you'll probably be doing this for a while, and if you try to stand you'll get tired before your razor gets sharp. Notice how my elbow is held up off the table. Keeping your elbow up allows you to make even, smooth strokes.
Notice that I'm only using one hand. Some guys do quite well using two hands, but most find that it's easier to get consistent results using one.
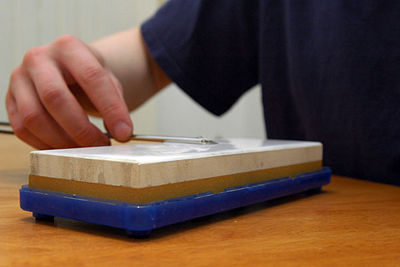
I recommend using an X-pattern stroke. To do an X stroke, you start with the whole blade on the hone, and as you draw the razor across the surface of the hone, you make a diagonal line with the tip of the razor.
The heel of the razor comes off the hone, and you end the stroke with only 1/3 of the blade resting on the hone.
Repeating the diagonal on the away stroke makes an X.
...
See?
Two critical points to remember during each stroke: 1) Use light, even strokes. 2) Keep the blade flat on the hone, with both the edge and the spine touching at all times. Bearing down on the razor with a lot of pressure will damage the delicate edge you're trying to create. The spine is a built-in angle guide, allowing you to keep the exact same angle on each stroke.
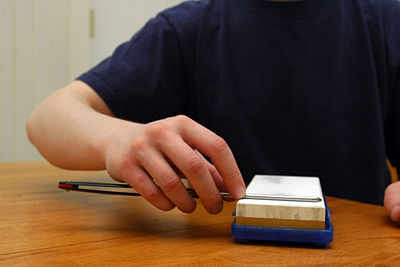
You begin the pyramid by honing on the 4000-grit side of the hone, which is the white side.We're just touching up a razor that's already pretty sharp, so we'll do a conservative pyramid. I do one X-pattern lap on the 4K side. A lap includes a stroke in each direction--forward and back--so both sides of the razor are getting honed equally.
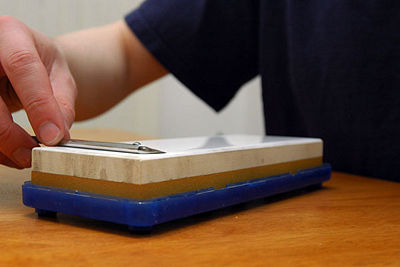
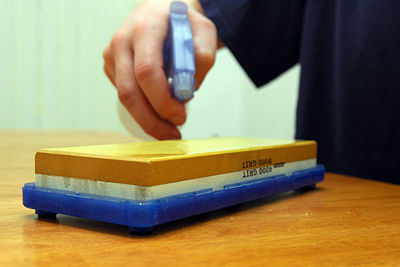
As I hone, the water soaks into the stone, so I keep misting the water on. You want to keep a puddle of water on top of the hone.
I flip the hone over...
mist on some more water...
and do five X-strokes...

on the yellow 8000-grit side.
I work my way through the rest of the pyramid: One stroke on the 4K, flip, five on the 8K. Three strokes on the 4K, flip, five on the 8K. Five strokes on the 4K, flip, five strokes on the 8K. Three strokes on the 4K, flip, five on the 8K. One stroke on the 4K, flip, five on the 8K. One stroke on the 4K, flip, five on the 8K. The last 1-5 steps require paying close attention to keeping the pressure light and the blade flat on the hone. The edge is very delicate at this stage, and you can damage it if you're not careful. One good clue to watch is the way the water responds to the razor. When the blade is flat, the edge will push a ripple of water in front of it.
That's all there is to it. Well, that and a bit of practice. This razor is ready for a test shave.
One other technique that I wanted to mention is circular honing.
If you have a razor that has some bad damage to the edge, like a chip or ding, circular honing on the 4K can help you work out the damage quickly.
Do do a circular honing stroke, lay the blade flat on the hone. Press down firmly and move the blade in small circles. Do maybe 10 or 20, then flip the blade over and repeat on the other side. The extra pressure and circular motions remove steel much faster than an X-pattern stroke.


See also[edit | edit source]
- Different strokes for honing a razor are explained in Strokes for honing a razor.
- The sharpness tests mentioned in this article are explained in more detail in Sharpness tests explained.
References[edit | edit source]
<u>