Difference between revisions of "Sleeving an oversized pivot"
(New page: This article was originally posted as [http://www.straightrazorplace.com/forums/workshop/32287-illustrated-guide-sleeving-oversized-pivot.html] by [http://www.straightrazorplace.com/forums...) |
|||
| Line 1: | Line 1: | ||
This article was originally posted as [http://www.straightrazorplace.com/forums/workshop/32287-illustrated-guide-sleeving-oversized-pivot.html] by [http://www.straightrazorplace.com/forums/members/gssixgun.html gssixgun] | This article was originally posted as [http://www.straightrazorplace.com/forums/workshop/32287-illustrated-guide-sleeving-oversized-pivot.html] by [http://www.straightrazorplace.com/forums/members/gssixgun.html gssixgun] | ||
| + | When you have an over-sized pivot hole you need to fill that space, you have some options here, some people fill the entire hole with epoxy and then re-drill the hole, some use a combination of a sleeve and the epoxy... Myself I just sleeve it as close as I can get it .... My theory is that these razors have been riding around on 1/16 rods for about 100 years so any thing tighter will probably last another 100 years.... I have a few different sizes of brass tubing in the shop starting with this stuff with a 1/16 ID hole, all of them slip into one another, so I can increase the size of the OD without any trouble (I use the same principle for making brass center pins) | ||
| + | Once the razor is ready to pin I chose the closest sized tubing to the hole, sometime like this razor, I only have to use one sleeve, sometimes two.. | ||
| − | + | <gallery caption="" widths="350px" heights="300px" perrow="2"> | |
| − | + | Image:Illustrated_Guide_to_Sleeving_an_Oversized_Pivot_-_001.jpg | I cut the tubing to approximate size so it will fit inside the tang without rubbing. | |
| − | + | Image:Illustrated_Guide_to_Sleeving_an_Oversized_Pivot_-_002.jpg | | |
| − | + | Image:Illustrated_Guide_to_Sleeving_an_Oversized_Pivot_-_003.jpg | I fit it, then smooth up the edges | |
| − | + | Image:Illustrated_Guide_to_Sleeving_an_Oversized_Pivot_-_004.jpg | The easiest way I have figured out to do this is to put the sleeve over the pin first, note the bearing washer under the sleeve | |
| − | + | Image:Illustrated_Guide_to_Sleeving_an_Oversized_Pivot_-_005.jpg | Put the razor on, then another bearing washer, then scale and pin as usual | |
| − | |||
| − | |||
| − | |||
| − | |||
| − | |||
| − | <gallery caption=" | ||
| − | Image: | ||
| − | Image: | ||
| − | Image: | ||
| − | Image: | ||
| − | |||
| − | |||
| − | The | ||
| − | |||
| − | |||
| − | |||
| − | |||
| − | |||
| − | |||
| − | |||
| − | |||
| − | |||
| − | |||
| − | Image: | ||
| − | |||
| − | |||
| − | |||
| − | |||
| − | |||
</gallery> | </gallery> | ||
| − | |||
| − | |||
| − | |||
| − | |||
| − | |||
| − | + | This is a fast simple solution to over-sized pivot holes, you can probably do with this but as the razor moves and loosens in the scales you can run into problems with the edge hitting the scales and/or wedge it is just way easier to just throw a fast sleeve in there and eliminate any of these problems before they arrise... | |
== Notes == | == Notes == | ||
Revision as of 21:53, 22 February 2009
This article was originally posted as [1] by gssixgun
When you have an over-sized pivot hole you need to fill that space, you have some options here, some people fill the entire hole with epoxy and then re-drill the hole, some use a combination of a sleeve and the epoxy... Myself I just sleeve it as close as I can get it .... My theory is that these razors have been riding around on 1/16 rods for about 100 years so any thing tighter will probably last another 100 years.... I have a few different sizes of brass tubing in the shop starting with this stuff with a 1/16 ID hole, all of them slip into one another, so I can increase the size of the OD without any trouble (I use the same principle for making brass center pins) Once the razor is ready to pin I chose the closest sized tubing to the hole, sometime like this razor, I only have to use one sleeve, sometimes two..
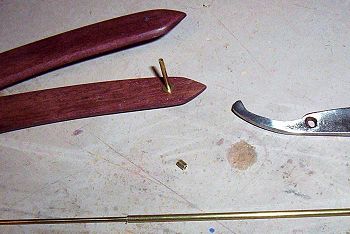
I cut the tubing to approximate size so it will fit inside the tang without rubbing.
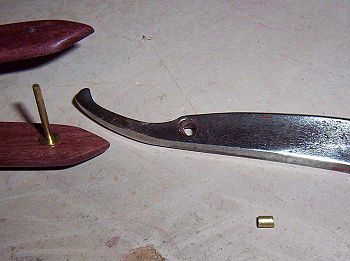
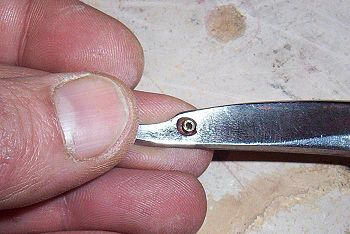
I fit it, then smooth up the edges

The easiest way I have figured out to do this is to put the sleeve over the pin first, note the bearing washer under the sleeve
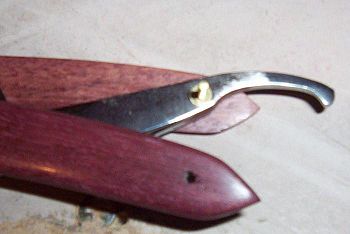
Put the razor on, then another bearing washer, then scale and pin as usual


This is a fast simple solution to over-sized pivot holes, you can probably do with this but as the razor moves and loosens in the scales you can run into problems with the edge hitting the scales and/or wedge it is just way easier to just throw a fast sleeve in there and eliminate any of these problems before they arrise...