Hand sanding a blade
This article was originally posted by Bruno in this post.
Contents
Background
The purpose of hand sanding is to bring a blade back to a near perfect finish, regardless of how badly damaged it was. Otherwise you might as well use a dremel and sanding discs. Those sanding discs and drum wheels cost money, and if you have to remove bad pitting, you will spend a lot.
The Ergonomics
Hand sanding a badly damage blade can take up 10 hours or more to do it right. Holding the sandpaper in your hand, or keeping it wrapped around something is a sure way to attract tendinitis. Been there, done that, found a better way.
- Bruno's Sanding Stick
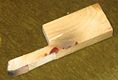
This is my sanding stick. It looks like crap, but it does the job well. I made it from some scrap wood, and it fits my hand just right.
The sanding stick with sandpaper on it - ready for action.


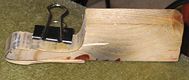
The big part just fits in my hand, and I usually keep my index finger touching the thin part when I hold it. This way all tendons are in a relaxed state when I sand. The tip is wrapped with a strip of leather. This helps distribute the pressure evenly. The wood underneath it will have some irregularities that are visible otherwise when sanding with finer grits.
If the sandpaper gets loaded with crud, I move the strip of paper a couple of mm and continue.
The sanding itself
Let me tell about the difficult part: damage removal. This is the most tedious part of sanding, because if a blade is pitted, you have to take away a LOT of metal to remove the pitting, and you have to take away metal across the length of the blade, or you will end up with a blade that looks like some metal was scooped out of it.
Experience has taught me that the best way to remove pitting is by first sanding circular with a very low grit (80 - 120).
Circular Sanding

Circular sanding works quickest, and I think this is why: if you sand circular while going back and forth a bit, you are always sanding across (and NOT along) previous scratch lines. If you hit scratch lines from a different direction, they will come off much more easily than if you sand along the same direction continuously. Especially if there is a lot of pitting, you want metal removal to go as fast as possible.
Every now and again when the blade is completely scratched and satin looking, you sand back and forth along the blade until it is semi mirror shine. Even at high grits this is pretty easy, and you will quickly get an idea of where you're at.
Lengthwise Sanding

Instead of circular sanding you could also speed up metal removal by sanding first from spine to edge, and then from heel to toe, and then from spine to edge again, but sanding from spine to edge is uncomfortable because the distance is so short.
As soon as all the damage is gone you are ready to go up in grit. Don't go up sooner because low grit is the fastest way to remove damage. Don't even think about sanding away left over pits with 400 grit paper, no matter how fed up you are with low grit sanding.
As soon as I am satisfied that the damage is gone, I use the following progression: 150 180 240 320 400 600 1000 1200 1500 2000.
At 240 I change my sanding method. From then onwards I will do 1 grit from edge to spine until all the previous scratch lines are gone. Then I go to the next grit and go from heel to toe until all previous scratch lines are gone.
If you removed all the pitting with the low grit, then from 400 onwards it takes very little time to progress.
By the time you hit 2000, the blade will be mirror shining, and ready for the dremel, buffing wheel and polishing compound.