Difference between revisions of "Holesaw Brush Handle"
(Created page with '= Warninig = This method for making brush handles can be potentially dangerous if you are not careful. If you think you would like to try this method, please read the entire ar…') |
(Formatting and orthography.) |
||
| Line 1: | Line 1: | ||
| − | + | This method for shaping brush handles is designed for someone without access to a lathe. Considering the most jarring part lathing is removing the corners of the wood, this method uses holesaws to preshape pieces to be round so you can dive into file and sanding. If you are looking for perfect precision or any shape brush your imagination can muster you may want to check elsewhere as there will be limitations to this method. However if you want to build a nice brush handle and you don't have many tools to do it, you may be in the right place. If you would like to make a brush out of wood that is known for splintering in a lathe, this again may be a good method for you. | |
| − | + | If you have to buy all the pieces for this project it may be only a small investment more to buy the craftsman mini lathe from Sears for $150 after you calculate the cost of the drill, holesaws, and misc equipment (There is also an option for a lathe from HarborFreight that is powered by a mounted drill). Go through the items you will need and compare the cost before rushing out and diving. | |
| − | + | == A warning before you begin == | |
| − | + | This method for making brush handles can be potentially dangerous if you are not careful. If you think you would like to try this method, please read the entire article first, there is information that can keep you from hurting yourself (I learned this the hard way so you don't have to). | |
| − | |||
| − | |||
| − | |||
| − | |||
| − | + | == Required equipment == | |
| − | |||
| − | |||
| − | |||
| − | |||
| − | |||
| − | |||
| − | |||
| − | == | ||
[[Image:HSB Equipment.jpg|276x283px]] | [[Image:HSB Equipment.jpg|276x283px]] | ||
| − | + | # Forsner Bit (for boring hole for Nib) | |
| − | + | # Holesaw (sized for the desired thickness of the handle) | |
| − | + | # Wooden Dowel | |
| − | + | # Steel Dowel | |
| − | + | # Drill (variable speed preferred) | |
| − | + | # Pipe Hanger (or any item you can find to secure the drill to your bench) | |
| − | + | # Assorted Hardware (rubber washers, washers, lock washers, nuts, all thread) | |
| − | + | # Handle Material (I am using Ebony and Wenge). | |
| − | |||
| − | |||
| − | |||
| − | |||
| − | |||
| − | |||
| − | |||
| − | |||
| − | |||
| − | |||
| − | |||
| − | |||
| − | |||
| − | |||
| − | |||
| − | |||
| − | |||
| − | |||
| − | |||
| − | |||
| − | |||
| − | |||
| − | |||
| − | |||
| − | |||
| − | |||
| − | |||
| − | + | ''**note**'': ''My dowels and all thread are 1/4 inch because that is the size of my holesaw mandrel. You will want to make sure your equipment is sized for your mandrel as well.'' | |
| − | + | == Making the handle == | |
| + | === Rough up === | ||
| − | + | Start by drilling your wood with the hole saws to get your pieces round. The Forsner bit and holesaw will want to battle for a center tap. If you drill with the Forsner first for the nib hole you will not have any wood for the holesaw mandrel and vice versa. | |
| − | I | + | <gallery caption="Roughing up the handle" widths="400px" heights="250px" perrow="2"> |
| + | Image:HSB Holesaws.jpg|I found it better to drill some with the Forsner bit first just until you get a little sidewall around it to keep it steady. Followed by using the holesaw and then finishing with the Forsner bit. I used two different sized hole saws to give this handle shape, this is something you may want to consider when planning yours as shaping the wood using this method takes time. | ||
| + | Image:HSB PreGlue.jpg| If you are using multiple woods as I am you will want to glue these pieces together so make sure you have the ends properly sanded and ready to glue. You will use the all thread, nuts, and washers to hold it altogether while the wood dries. These assorted hardware pieces all play a roll, so don't skip out. The rubber washer protects the wood and lends traction. The washer protects the rubber washer and the lock washer makes sure the nuts to come flying off (I'm betting you don't want nuts coming off and flying at your face, pun intended). | ||
| + | Image:HSB Glued.jpg| I used standard wood glue between each piece then tightened down the nuts and let it dry overnight. I cut the threaded shaft to hold the handle with enough left over to fit in my drill chuck with no excess shaft between the nut and chuck. Make sure to ''file the ends when you cut the threaded shaft''. | ||
| + | </gallery> | ||
| − | + | === Mounting === | |
| − | + | <gallery caption="Mounting the handle" widths="400px" heights="250px" perrow="2"> | |
| − | + | Image:HSB Drill.jpg | I am using a pipe hanger to mount my drill because it is shaped to work really well (my father found this item for mounting, I would have never guessed). I then mounted the drill in my bench vise so I could use it hands free. Which ever method you use to mount your drill, just make sure it is secure to prevent wobble as this will effect the outcome of your handle. | |
| − | + | Image:HSB DrillMounted.jpg| Next you will want to put your piece in the drill chuck so you can start turning it. I used files to start carving the initial shape, but ''be careful'', you don't want to put too much pressure on the all thread and bend it. | |
| − | Next you will want to put | + | Image:HSB Files.jpg| Let the tool do the work and be patient with it, this is not a race. |
| − | + | </gallery> | |
| − | + | === Another warning === | |
| − | |||
| − | |||
| − | |||
| − | = | ||
[[Image:HSB Arrows.jpg|367x298px]] | [[Image:HSB Arrows.jpg|367x298px]] | ||
| − | See how I visually divide my project in half? '''Only work on the half that is closest to the drill chuck! '''The further you go from the chuck, the more leverage you have with the same amount of pressure. Too much pressure on the outside of the | + | See how I visually divide my project in half? '''Only work on the half that is closest to the drill chuck! '''The further you go from the chuck, the more leverage you have with the same amount of pressure. Too much pressure on the outside of the piece and you may curve the all thread shaft. At best this will cause wobble and a very uneven piece, yet it is not impossible to bent the all thread enough to cause a dangerous situation (think L bracket in a drill bit and your hand in the mix, not pretty). If you want to work on the other side of the piece simply stop the drill and turn in over so the other side is closer to the drill bit. |
| − | |||
| − | |||
| − | |||
| − | |||
| − | |||
| − | |||
| − | |||
| − | |||
| − | |||
| − | |||
| − | |||
| − | |||
| − | |||
| − | |||
| − | |||
| − | |||
| − | |||
| − | |||
| − | |||
| − | |||
| − | |||
| − | |||
| − | |||
| − | |||
| − | + | Pay attention to the exposed threaded shaft as well. Not only will this end show you if you are getting too much wobble, but if you left a burr on the end of the thread when you cut it to size it will be a spinning razor (please do not attempt to shave with the spinning razor). | |
| − | + | === Filling the gaps === | |
| − | + | <gallery caption="Filling the gaps" widths="400px" heights="250px" perrow="2"> | |
| + | Image:HSB Peg.jpg |Once you have shaped your peice you will want to cut a piece of the wooden dowel just a bit shorter than the handle length and glue it into the hole left by the holesaw's mandrel. This will make sure your handle is still light weight as well as making sure your multiple pieces of wood have a nice solid core for extra reinforcement. This will also make sure you don't loose the glue for holding the nib down a long hole. | ||
| + | Image:HSB Cap.jpg | I have also sanded and polished one end of my steel dowel to a mirror finish and then cut it to fit the remaining hole to use as a finish cap on the top of the brush. I used epoxy to fix the metal cap into the top hole. | ||
| + | Image:HSB Unfinished.jpg | Here is the brush handle shaped, sanded, and ready to start applying the protective coat. | ||
| + | Image:HSB Magnet.jpg| Here I have attached a magnet to the my Dremel to hang the brush handle while the first (of many) coat of poly dries. The metal cap at the top of the brush allows me to hang and remove the handle on a magnet with no effort. Can you guess how I will be designing the brush stand to hold the brush when finished? | ||
| + | </gallery> | ||
| + | [[Category:Do_It_Yourself]] | ||
Latest revision as of 05:29, 23 December 2009
This method for shaping brush handles is designed for someone without access to a lathe. Considering the most jarring part lathing is removing the corners of the wood, this method uses holesaws to preshape pieces to be round so you can dive into file and sanding. If you are looking for perfect precision or any shape brush your imagination can muster you may want to check elsewhere as there will be limitations to this method. However if you want to build a nice brush handle and you don't have many tools to do it, you may be in the right place. If you would like to make a brush out of wood that is known for splintering in a lathe, this again may be a good method for you.
If you have to buy all the pieces for this project it may be only a small investment more to buy the craftsman mini lathe from Sears for $150 after you calculate the cost of the drill, holesaws, and misc equipment (There is also an option for a lathe from HarborFreight that is powered by a mounted drill). Go through the items you will need and compare the cost before rushing out and diving.
Contents
A warning before you begin[edit | edit source]
This method for making brush handles can be potentially dangerous if you are not careful. If you think you would like to try this method, please read the entire article first, there is information that can keep you from hurting yourself (I learned this the hard way so you don't have to).
Required equipment[edit | edit source]

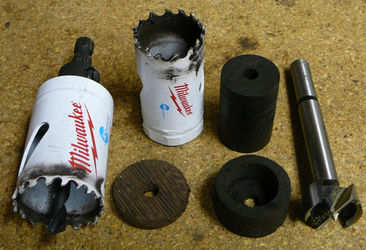
- Forsner Bit (for boring hole for Nib)
- Holesaw (sized for the desired thickness of the handle)
- Wooden Dowel
- Steel Dowel
- Drill (variable speed preferred)
- Pipe Hanger (or any item you can find to secure the drill to your bench)
- Assorted Hardware (rubber washers, washers, lock washers, nuts, all thread)
- Handle Material (I am using Ebony and Wenge).
**note**: My dowels and all thread are 1/4 inch because that is the size of my holesaw mandrel. You will want to make sure your equipment is sized for your mandrel as well.
Making the handle[edit | edit source]
Rough up[edit | edit source]
Start by drilling your wood with the hole saws to get your pieces round. The Forsner bit and holesaw will want to battle for a center tap. If you drill with the Forsner first for the nib hole you will not have any wood for the holesaw mandrel and vice versa.
- Roughing up the handle
I found it better to drill some with the Forsner bit first just until you get a little sidewall around it to keep it steady. Followed by using the holesaw and then finishing with the Forsner bit. I used two different sized hole saws to give this handle shape, this is something you may want to consider when planning yours as shaping the wood using this method takes time.
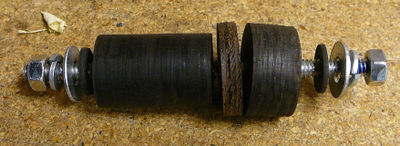
If you are using multiple woods as I am you will want to glue these pieces together so make sure you have the ends properly sanded and ready to glue. You will use the all thread, nuts, and washers to hold it altogether while the wood dries. These assorted hardware pieces all play a roll, so don't skip out. The rubber washer protects the wood and lends traction. The washer protects the rubber washer and the lock washer makes sure the nuts to come flying off (I'm betting you don't want nuts coming off and flying at your face, pun intended).
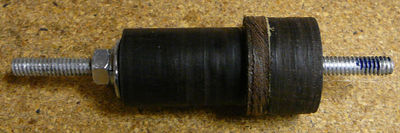
I used standard wood glue between each piece then tightened down the nuts and let it dry overnight. I cut the threaded shaft to hold the handle with enough left over to fit in my drill chuck with no excess shaft between the nut and chuck. Make sure to file the ends when you cut the threaded shaft.


Mounting[edit | edit source]
- Mounting the handle
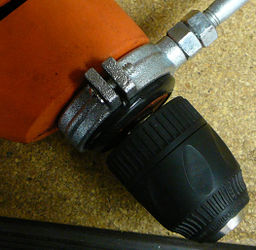
I am using a pipe hanger to mount my drill because it is shaped to work really well (my father found this item for mounting, I would have never guessed). I then mounted the drill in my bench vise so I could use it hands free. Which ever method you use to mount your drill, just make sure it is secure to prevent wobble as this will effect the outcome of your handle.
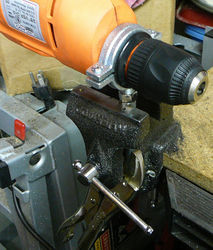
Next you will want to put your piece in the drill chuck so you can start turning it. I used files to start carving the initial shape, but be careful, you don't want to put too much pressure on the all thread and bend it.
Let the tool do the work and be patient with it, this is not a race.


Another warning[edit | edit source]

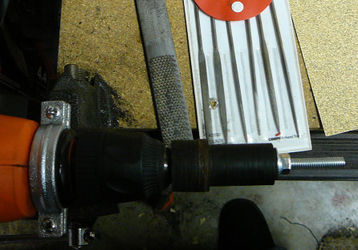
See how I visually divide my project in half? Only work on the half that is closest to the drill chuck! The further you go from the chuck, the more leverage you have with the same amount of pressure. Too much pressure on the outside of the piece and you may curve the all thread shaft. At best this will cause wobble and a very uneven piece, yet it is not impossible to bent the all thread enough to cause a dangerous situation (think L bracket in a drill bit and your hand in the mix, not pretty). If you want to work on the other side of the piece simply stop the drill and turn in over so the other side is closer to the drill bit.
Pay attention to the exposed threaded shaft as well. Not only will this end show you if you are getting too much wobble, but if you left a burr on the end of the thread when you cut it to size it will be a spinning razor (please do not attempt to shave with the spinning razor).
Filling the gaps[edit | edit source]
- Filling the gaps

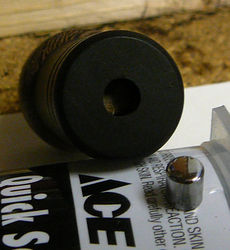
Once you have shaped your peice you will want to cut a piece of the wooden dowel just a bit shorter than the handle length and glue it into the hole left by the holesaw's mandrel. This will make sure your handle is still light weight as well as making sure your multiple pieces of wood have a nice solid core for extra reinforcement. This will also make sure you don't loose the glue for holding the nib down a long hole.
I have also sanded and polished one end of my steel dowel to a mirror finish and then cut it to fit the remaining hole to use as a finish cap on the top of the brush. I used epoxy to fix the metal cap into the top hole.
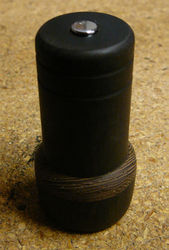
Here is the brush handle shaped, sanded, and ready to start applying the protective coat.
Here I have attached a magnet to the my Dremel to hang the brush handle while the first (of many) coat of poly dries. The metal cap at the top of the brush allows me to hang and remove the handle on a magnet with no effort. Can you guess how I will be designing the brush stand to hold the brush when finished?


