Difference between revisions of "Pyramid honing guide"
m (→Pyramid Honing: A Photo Tutorial) |
m (*snore*) |
||
| Line 107: | Line 107: | ||
<gallery widths="400px" heights="267px" perrow="2"> | <gallery widths="400px" heights="267px" perrow="2"> | ||
Image:Pyramid_Honing-_A_Photo_Tutorial_by_Josh_Earl_-_DSC_4325.JPG |Here's a shot of all my honing equipment. The tub of water is to soak the Norton combo hone. You need to soak it for about 15 minutes before honing to allow the water to permeate the 4K side of the hone. Those steel plates are DMT diamond hones, 325 grit and 1200 grit. I use the 325-grit hone for lapping, and the 1200-grit one for dealing with chipped edges. The green cloth is a cheap microfiber cloth from Wal-Mart. These are great for drying off the blade to check on the edge. I use the spray bottle to mist the surface of the hone with water as I go. | Image:Pyramid_Honing-_A_Photo_Tutorial_by_Josh_Earl_-_DSC_4325.JPG |Here's a shot of all my honing equipment. The tub of water is to soak the Norton combo hone. You need to soak it for about 15 minutes before honing to allow the water to permeate the 4K side of the hone. Those steel plates are DMT diamond hones, 325 grit and 1200 grit. I use the 325-grit hone for lapping, and the 1200-grit one for dealing with chipped edges. The green cloth is a cheap microfiber cloth from Wal-Mart. These are great for drying off the blade to check on the edge. I use the spray bottle to mist the surface of the hone with water as I go. | ||
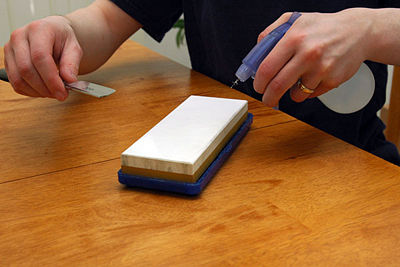
| − | Image:Pyramid_Honing-_A_Photo_Tutorial_by_Josh_Earl_-_DSC_4327.JPG | | + | Image:Pyramid_Honing-_A_Photo_Tutorial_by_Josh_Earl_-_DSC_4327.JPG |After allowing the Norton to soak for 15 minutes or so, until bubbles stop coming out of it, it's time to lap it. Lapping is done to flatten and clean the hone. I've also done a [[Hone_Lapping_101 |lapping photo tutorial]. I'm lapping this hone with my 325-grit DMT hone, which is fast and not too messy. The running water keeps the DMT from clogging. A freshly lapped hone is a joy to use. The surfaces are smooth and cut efficiently. |
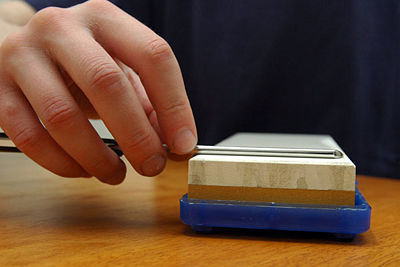
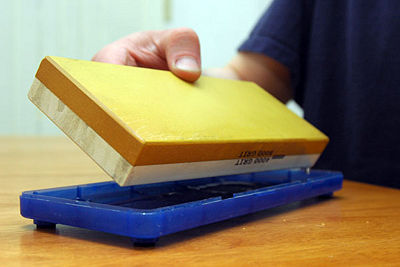
| − | Image:Pyramid_Honing-_A_Photo_Tutorial_by_Josh_Earl_-_DSC_4329.JPG | | + | Image:Pyramid_Honing-_A_Photo_Tutorial_by_Josh_Earl_-_DSC_4329.JPG |Holding the razor properly is important. I find that I get the best results if I hold the shank of the razor lightly between my thumb and first two fingers. Keep your fingers on the sides of the shank, not gripping the top and bottom. You want to pull and push the razor along the surface, not press the blade down into the hone. My ring finger and pinky curl under the scales, lightly supporting them during the stroke. |
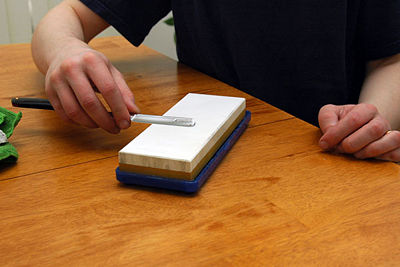
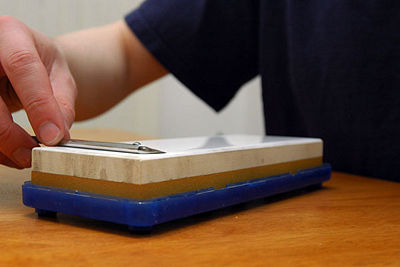
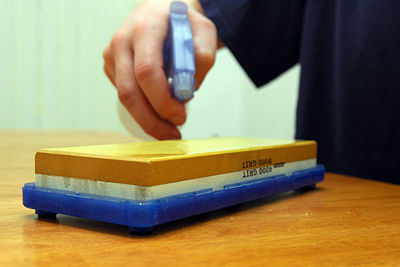
| − | Image:Pyramid_Honing-_A_Photo_Tutorial_by_Josh_Earl_-_DSC_4331.JPG | | + | Image:Pyramid_Honing-_A_Photo_Tutorial_by_Josh_Earl_-_DSC_4331.JPG | This photo shows the posture I use when honing. I struggled a lot when I was starting out until I got Lynn's DVD and copied his posture. Position the hone so that it points away from your body. I find that it's much easier to keep the razor flat on the hone when your strokes are going toward and away from you, instead of side to side. Honing seated is better than trying to stand, because your face is closer to your hands and you can see what you're doing better. Also, you'll probably be doing this for a while, and if you try to stand you'll get tired before your razor gets sharp. Notice how my elbow is held up off the table. Keeping your elbow up allows you to make even, smooth strokes. |
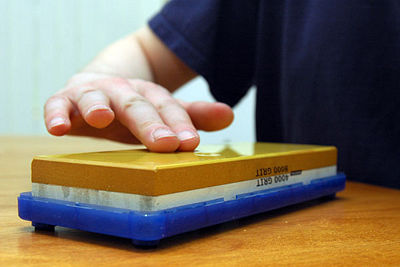
| − | Image:Pyramid_Honing-_A_Photo_Tutorial_by_Josh_Earl_-_DSC_4332.JPG | | + | Image:Pyramid_Honing-_A_Photo_Tutorial_by_Josh_Earl_-_DSC_4332.JPG |Notice that I'm only using one hand. Some guys do quite well using two hands, but most find that it's easier to get consistent results using one. |
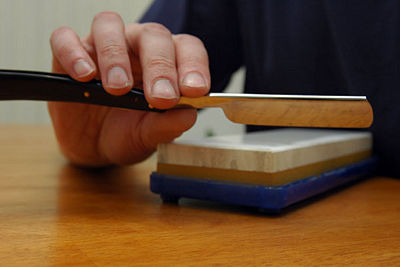
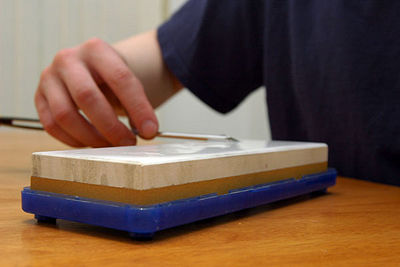
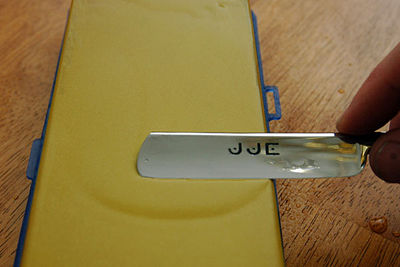
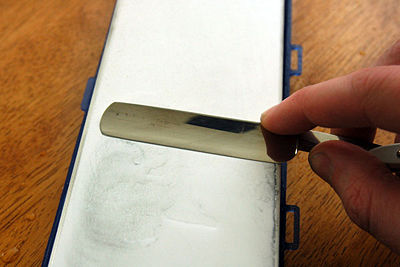
| − | Image:Pyramid_Honing-_A_Photo_Tutorial_by_Josh_Earl_-_DSC_4333.JPG | | + | Image:Pyramid_Honing-_A_Photo_Tutorial_by_Josh_Earl_-_DSC_4333.JPG |I recommend using an X-pattern stroke. To do an X stroke, you start with the whole blade on the hone, and as you draw the razor across the surface of the hone, you make a diagonal line with the tip of the razor. |
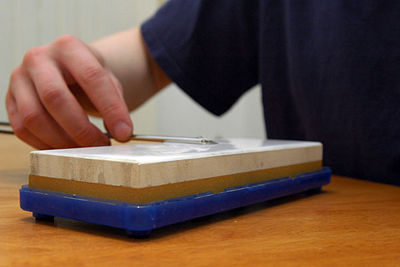
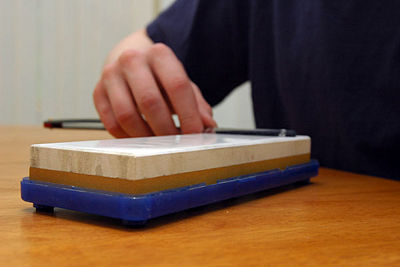
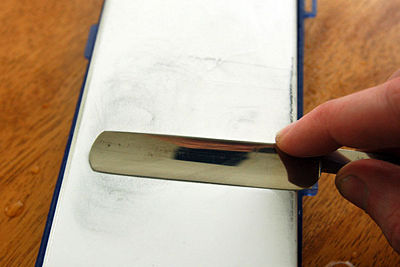
| − | Image:Pyramid_Honing-_A_Photo_Tutorial_by_Josh_Earl_-_DSC_4335.JPG | | + | Image:Pyramid_Honing-_A_Photo_Tutorial_by_Josh_Earl_-_DSC_4335.JPG |The heel of the razor comes off the hone, and you end the stroke with only 1/3 of the blade resting on the hone. |
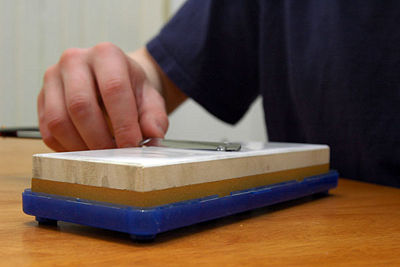
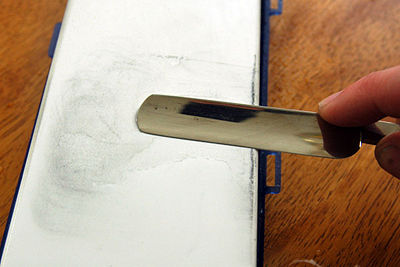
| − | Image:Pyramid_Honing-_A_Photo_Tutorial_by_Josh_Earl_-_DSC_4339.JPG | | + | Image:Pyramid_Honing-_A_Photo_Tutorial_by_Josh_Earl_-_DSC_4339.JPG |Repeating the diagonal on the away stroke makes an X. |
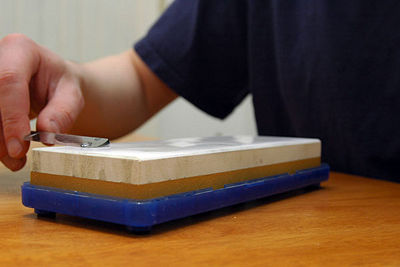
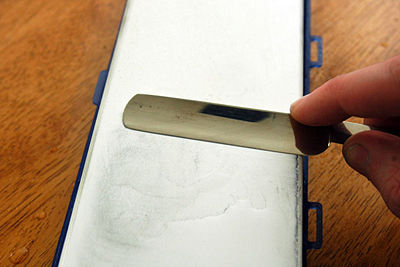
| − | Image:Pyramid_Honing-_A_Photo_Tutorial_by_Josh_Earl_-_DSC_4340.JPG | | + | Image:Pyramid_Honing-_A_Photo_Tutorial_by_Josh_Earl_-_DSC_4340.JPG |... |
| − | Image:Pyramid_Honing-_A_Photo_Tutorial_by_Josh_Earl_-_DSC_4341.JPG | | + | Image:Pyramid_Honing-_A_Photo_Tutorial_by_Josh_Earl_-_DSC_4341.JPG |See? |
| − | Image:Pyramid_Honing-_A_Photo_Tutorial_by_Josh_Earl_-_DSC_4342.JPG | | + | Image:Pyramid_Honing-_A_Photo_Tutorial_by_Josh_Earl_-_DSC_4342.JPG | Two critical points to remember during each stroke: 1) Use light, even strokes. 2) Keep the blade flat on the hone, with both the edge and the spine touching at all times. Bearing down on the razor with a lot of pressure will damage the delicate edge you're trying to create. The spine is a built-in angle guide, allowing you to keep the exact same angle on each stroke. |
Image:Pyramid_Honing-_A_Photo_Tutorial_by_Josh_Earl_-_DSC_4344.JPG | | Image:Pyramid_Honing-_A_Photo_Tutorial_by_Josh_Earl_-_DSC_4344.JPG | | ||
Image:Pyramid_Honing-_A_Photo_Tutorial_by_Josh_Earl_-_DSC_4345.JPG | | Image:Pyramid_Honing-_A_Photo_Tutorial_by_Josh_Earl_-_DSC_4345.JPG | | ||
| Line 139: | Line 139: | ||
== See also == | == See also == | ||
| − | This HowTo is also available as a PDF file: [[media:Norton_Pyramid_Honing_Guide.pdf | Norton Pyramid Honing Guide]]. | + | * This HowTo is also available as a PDF file: [[media:Norton_Pyramid_Honing_Guide.pdf | Norton Pyramid Honing Guide]]. |
| − | + | * The sharpness tests mentioned in this article are explained in more detail in [[Sharpness tests explained]]. | |
| − | |||
| − | |||
| − | |||
| − | * [[Sharpness tests explained]] | ||
== Acknowledgements == | == Acknowledgements == | ||
Revision as of 17:24, 16 March 2009
The purpose of the 1000 grit is to remove nicks and straighten/shape an edge. For that you use your eyes and the Thumb Nail test, not the Thumb Pad Test. The edge should be free of nicks and the bevel should go all the way to the edge. If you are using a hand held microscope then the bevel will appear as one color, if there are two bevels, old and new, then the light reflects off the bevel at different angles and appears as two colors. The scratch pattern should also be uniform for both the length and width of the bevel. When you have that then move on to the 4000, but not before.
Contents
Using the Norton 1k - getting rid of nicks and establishing the bevel
The Norton 1000 is a slow cutter compared to a 1000 grit wet/dry sandpaper or a 1200 grit diamond hone. Use what ever number of strokes it requires to get rid of the nicks and establishing a bevel. This is the most time consuming portion of honing a razor, be patient and persistent.
Using the Norton 4k - using the Norton Pyramids to dial in an edge
Once you get to the 4000 grit then you stop using the Thumb Nail Test (TNT) and rely upon the Thumb Pad Test and Hanging Hair Test (HHT). You should be using both the TNT and the TPT while you are using the 1000 grit so that you develop a "feel" for what is happening to the edge.
When you start using the 4000 grit then use an aggressive pyramid first, testing with the TPT frequently, and when it seems that you are getting close based on the TPT, HHT and the arm hair test then drop down to a conservative pyramid, again, testing frequently. Then perform 50 roundtrip laps on a plain leather hanging strop and test shave. Do the best beard prep possible. Do not be surprised if the razor is not quite perfect. Just go back and perform a conservative pyramid then strop and test shave again. It is not unusual for me to take 2-3-4 honing sessions to dial in an edge.
Conservative Honing Ratio
This is a suggestion for a straight razor that is almost keen. It shaves but it pulls at the whiskers. I use the thumb test to see when the edge has attained a noticeable change in feel. Then strop for 35 laps on plain leather and test shave.
Repeat as necessary.
Please note that this only applies to the use of a Norton waterstone. It does not apply to Japanese waterstones, a Belgian stone, Arkansas stones, classic barber hones, pasted strops or sandpaper.
Use the thumb pad test at any point during this sequence and stop if you feel the edge is now keen.
| Set # | Norton 4000 | Norton 8000 |
|---|---|---|
| 1 | 1 | 5 |
| 2 | 1 | 5 |
| 3 | 3 | 5 |
| 4 | 5 | 5 |
| 5 | 3 | 5 |
| 6 | 3 | 5 |
| 7 | 1 | 5 |
| 8 | 1 | 5 |
| 9 | 1 | 5 |
Aggressive Honing Ratio
Use this sequence when the razor is not shaving at all.
| Set # | Norton 4000 | Norton 8000 |
|---|---|---|
| 1 | 15 | 5 |
| 2 | 10 | 5 |
| 3 | 5 | 5 |
| 4 | 3 | 5 |
| 5 | 1 | 5 |
| 6 | 1 | 5 |
Be sure and use some sort of test before starting so you can evaluate the rate of change that is occurring. I use the thumb pad test and the hanging hair test. Repeat the honing sequence as necessary and move to the conservative sequence when you think you are getting close. The goal is to avoid over-honing which can make the edge act like a piece of aluminium foil because it is to thin and weak.
Pyramid Honing: A Photo Tutorial
The following guide was written by JoshEarl[1]
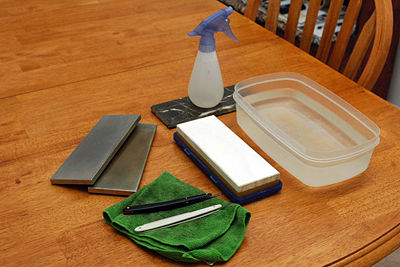
Here's a shot of all my honing equipment. The tub of water is to soak the Norton combo hone. You need to soak it for about 15 minutes before honing to allow the water to permeate the 4K side of the hone. Those steel plates are DMT diamond hones, 325 grit and 1200 grit. I use the 325-grit hone for lapping, and the 1200-grit one for dealing with chipped edges. The green cloth is a cheap microfiber cloth from Wal-Mart. These are great for drying off the blade to check on the edge. I use the spray bottle to mist the surface of the hone with water as I go.

lapping photo tutorial]. I'm lapping this hone with my 325-grit DMT hone, which is fast and not too messy. The running water keeps the DMT from clogging. A freshly lapped hone is a joy to use. The surfaces are smooth and cut efficiently.
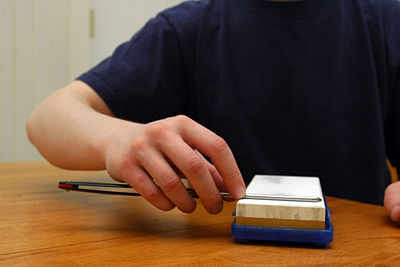
Holding the razor properly is important. I find that I get the best results if I hold the shank of the razor lightly between my thumb and first two fingers. Keep your fingers on the sides of the shank, not gripping the top and bottom. You want to pull and push the razor along the surface, not press the blade down into the hone. My ring finger and pinky curl under the scales, lightly supporting them during the stroke.
This photo shows the posture I use when honing. I struggled a lot when I was starting out until I got Lynn's DVD and copied his posture. Position the hone so that it points away from your body. I find that it's much easier to keep the razor flat on the hone when your strokes are going toward and away from you, instead of side to side. Honing seated is better than trying to stand, because your face is closer to your hands and you can see what you're doing better. Also, you'll probably be doing this for a while, and if you try to stand you'll get tired before your razor gets sharp. Notice how my elbow is held up off the table. Keeping your elbow up allows you to make even, smooth strokes.
Notice that I'm only using one hand. Some guys do quite well using two hands, but most find that it's easier to get consistent results using one.
I recommend using an X-pattern stroke. To do an X stroke, you start with the whole blade on the hone, and as you draw the razor across the surface of the hone, you make a diagonal line with the tip of the razor.
The heel of the razor comes off the hone, and you end the stroke with only 1/3 of the blade resting on the hone.
Repeating the diagonal on the away stroke makes an X.
...
See?
Two critical points to remember during each stroke: 1) Use light, even strokes. 2) Keep the blade flat on the hone, with both the edge and the spine touching at all times. Bearing down on the razor with a lot of pressure will damage the delicate edge you're trying to create. The spine is a built-in angle guide, allowing you to keep the exact same angle on each stroke.


Credits
Credit for making known the honing pyramid technique goes to Lynn Abrams, the founder of the Yahoo Straightrazorplace forum and the http://www.straightrazorplace.com website.
To Lynn and all the other razor gurus "THANKS !"
See also
- This HowTo is also available as a PDF file: Norton Pyramid Honing Guide.
- The sharpness tests mentioned in this article are explained in more detail in Sharpness tests explained.