Difference between revisions of "Building a pseudo-Redneck import-Viking razor holder"
m |
|||
| (3 intermediate revisions by 2 users not shown) | |||
| Line 1: | Line 1: | ||
| − | + | Inspired by Jockeys' redneck scuttles and what not, I decided that paying well over $20 for a simple razor holder is not really my thing. I appreciate quality, and will likely buy one since this experience told me what I knew before: Counting my hours, and a $100 holder would be good as well. On the other hand, I am a proud owner of a Schwarzweisskeramik scuttle. So there you go. | |
| − | So, pseudo-redneck since I'm not what one would call a redneck and an import-viking since I'm | + | So, pseudo-redneck since I'm not what one would call a redneck and an import-viking since I'm an import living in Sweden. Which brings us to the main subject of the el-cheaperino razor holder: A tootbrush holder, from Ikea of course. I paid, if I remember correctly, 59 SEK (Swedish Kronor) for it, around $8: [http://www.ikea.com/us/en/catalog/products/70074182 Ikea's Lillholmen toothbrush holder on the American site]. <!-- COMMENT |
| + | The syntax for the gallery is: | ||
| + | <gallery caption="Your caption here." widths="400px" heights="250px" perrow="2"> | ||
| + | File:Hillie-The-pseudo-Redneck-import-Viking-razor-holder-165723.jpg | Text for this image goes here... all in one line... <- Replace this | ||
| + | </gallery> | ||
| − | <gallery caption=" | + | Break up the gallery below if required. |
| + | --> | ||
| + | |||
| + | <gallery caption="The process of creating the holder" widths="400px" heights="250px" perrow="2"> | ||
File:Hillie-The-pseudo-Redneck-import-Viking-razor-holder-165720.jpg | What you see here is from left to right: My pretty Wostenholm almost-wedge. Super comfi shave, nicely restored by Steve at The Invisible Edge. Followed by the Ikea holder, my "bulky" file to remove the initial steel bulk, followed by a little file set for the detail work. Later on I'll also use some wet sandpaper, grit 1000, to clean up some stuff. Let's start with a few images to show you the thing. I picked the holder that I liked, both looks and quality (Ikea has both decent quality next to the flimsy stuff, so always keep an eye on what you pick there), and fortunately this one had the biggest holes. When I came home, I found that even my smallest razor wouldn't fit in, hence this project. | File:Hillie-The-pseudo-Redneck-import-Viking-razor-holder-165720.jpg | What you see here is from left to right: My pretty Wostenholm almost-wedge. Super comfi shave, nicely restored by Steve at The Invisible Edge. Followed by the Ikea holder, my "bulky" file to remove the initial steel bulk, followed by a little file set for the detail work. Later on I'll also use some wet sandpaper, grit 1000, to clean up some stuff. Let's start with a few images to show you the thing. I picked the holder that I liked, both looks and quality (Ikea has both decent quality next to the flimsy stuff, so always keep an eye on what you pick there), and fortunately this one had the biggest holes. When I came home, I found that even my smallest razor wouldn't fit in, hence this project. | ||
File:Hillie-The-pseudo-Redneck-import-Viking-razor-holder-165721.jpg | Purrreetttteeeeeyy. Well, for the money, it's a nice looking thing. | File:Hillie-The-pseudo-Redneck-import-Viking-razor-holder-165721.jpg | Purrreetttteeeeeyy. Well, for the money, it's a nice looking thing. | ||
| − | File:Hillie-The-pseudo-Redneck-import-Viking-razor-holder-165722.jpg | | + | File:Hillie-The-pseudo-Redneck-import-Viking-razor-holder-165722.jpg | Another view at the top. It still looks pretty. |
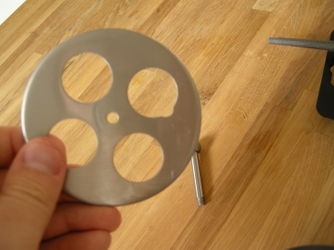
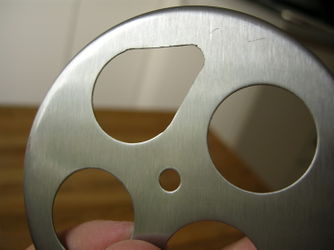
| − | File:Hillie-The-pseudo-Redneck-import-Viking-razor-holder-165723.jpg | | + | File:Hillie-The-pseudo-Redneck-import-Viking-razor-holder-165723.jpg | As you can see, you can take it apart easily. |
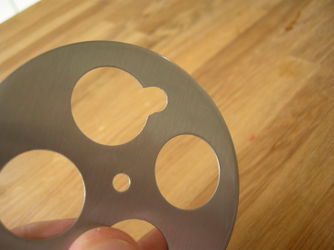
| − | File:Hillie-The-pseudo-Redneck-import-Viking-razor-holder-165724.jpg | | + | File:Hillie-The-pseudo-Redneck-import-Viking-razor-holder-165724.jpg | The first widening of the first hole, with the blue file. |
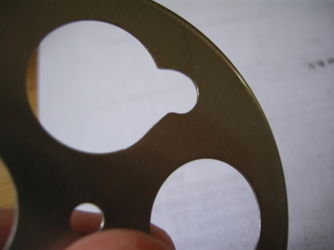
| − | File:Hillie-The-pseudo-Redneck-import-Viking-razor-holder-165725.jpg | | + | File:Hillie-The-pseudo-Redneck-import-Viking-razor-holder-165725.jpg | And we've reached the final depth. If you intend to do this, take some rough measurements and add a little more. That ought to do it. |
| − | File:Hillie-The-pseudo-Redneck-import-Viking-razor-holder-165726.jpg | | + | File:Hillie-The-pseudo-Redneck-import-Viking-razor-holder-165726.jpg | The tool to widen the hole. |
| − | File:Hillie-The-pseudo-Redneck-import-Viking-razor-holder-165727.jpg | | + | File:Hillie-The-pseudo-Redneck-import-Viking-razor-holder-165727.jpg | First bit of work with the flat file. |
| − | File:Hillie-The-pseudo-Redneck-import-Viking-razor-holder-165728.jpg | | + | File:Hillie-The-pseudo-Redneck-import-Viking-razor-holder-165728.jpg | And the first part of the first hole is done! |
| − | File:Hillie-The-pseudo-Redneck-import-Viking-razor-holder-165729.jpg | | + | File:Hillie-The-pseudo-Redneck-import-Viking-razor-holder-165729.jpg | Here the hole is complete. You'll see some roughness around the hole, I removed that with some 1000 grit sandpaper. The scratches to the right of the hole are because of my clumsiness. You can keep the metal nice if you work careful! |
| − | File:Hillie-The-pseudo-Redneck-import-Viking-razor-holder-165730.jpg | | + | File:Hillie-The-pseudo-Redneck-import-Viking-razor-holder-165730.jpg | Repeat for the other three holes. You see they're quite uneven (my inexperience in metalwork comes in) and the surface got scratched quite a bit more because of my sloppiness. I thought I'd correct it with sandpapering the whole surface. It doesn't look nice, and I hope to correct that some day. |
| − | File:Hillie-The-pseudo-Redneck-import-Viking-razor-holder-165731.jpg | | + | File:Hillie-The-pseudo-Redneck-import-Viking-razor-holder-165731.jpg | The metal part back on the holder. You see it's beat up, maybe I'll get a dremel or something to "brush" it nicely. |
| − | File:Hillie-The-pseudo-Redneck-import-Viking-razor-holder-165732.jpg | | + | File:Hillie-The-pseudo-Redneck-import-Viking-razor-holder-165732.jpg | And my Wostenholm sits comfortably! |
| − | + | </gallery><br> | |
| + | |||
| + | Some lessons learnt: | ||
| + | |||
| + | #Work more carefully. | ||
| + | #Draw the holes on the metal next time. | ||
| + | |||
| + | I got some hints on the forum on different materials to put on the edges of the hole. I'm considering a few options, but there are some nice materials available that'll fold around the metal. | ||
| + | |||
| + | [[Category:Do It Yourself]] | ||
Latest revision as of 10:44, 19 July 2009
Inspired by Jockeys' redneck scuttles and what not, I decided that paying well over $20 for a simple razor holder is not really my thing. I appreciate quality, and will likely buy one since this experience told me what I knew before: Counting my hours, and a $100 holder would be good as well. On the other hand, I am a proud owner of a Schwarzweisskeramik scuttle. So there you go.
So, pseudo-redneck since I'm not what one would call a redneck and an import-viking since I'm an import living in Sweden. Which brings us to the main subject of the el-cheaperino razor holder: A tootbrush holder, from Ikea of course. I paid, if I remember correctly, 59 SEK (Swedish Kronor) for it, around $8: Ikea's Lillholmen toothbrush holder on the American site.
- The process of creating the holder
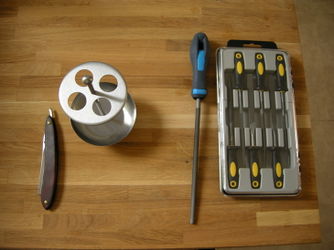
What you see here is from left to right: My pretty Wostenholm almost-wedge. Super comfi shave, nicely restored by Steve at The Invisible Edge. Followed by the Ikea holder, my "bulky" file to remove the initial steel bulk, followed by a little file set for the detail work. Later on I'll also use some wet sandpaper, grit 1000, to clean up some stuff. Let's start with a few images to show you the thing. I picked the holder that I liked, both looks and quality (Ikea has both decent quality next to the flimsy stuff, so always keep an eye on what you pick there), and fortunately this one had the biggest holes. When I came home, I found that even my smallest razor wouldn't fit in, hence this project.
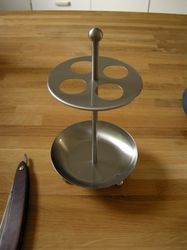
Purrreetttteeeeeyy. Well, for the money, it's a nice looking thing.
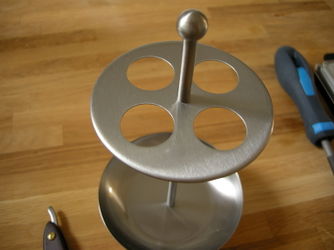
Another view at the top. It still looks pretty.
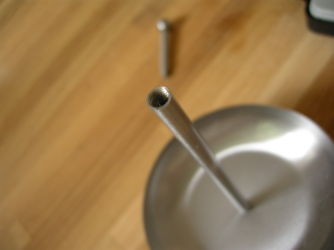
As you can see, you can take it apart easily.
The first widening of the first hole, with the blue file.
And we've reached the final depth. If you intend to do this, take some rough measurements and add a little more. That ought to do it.

The tool to widen the hole.
First bit of work with the flat file.
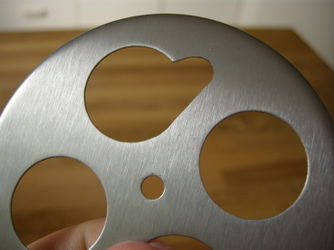
And the first part of the first hole is done!
Here the hole is complete. You'll see some roughness around the hole, I removed that with some 1000 grit sandpaper. The scratches to the right of the hole are because of my clumsiness. You can keep the metal nice if you work careful!
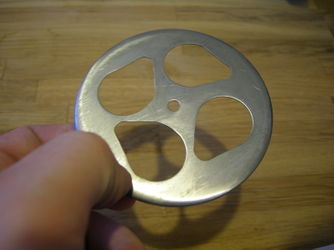
Repeat for the other three holes. You see they're quite uneven (my inexperience in metalwork comes in) and the surface got scratched quite a bit more because of my sloppiness. I thought I'd correct it with sandpapering the whole surface. It doesn't look nice, and I hope to correct that some day.
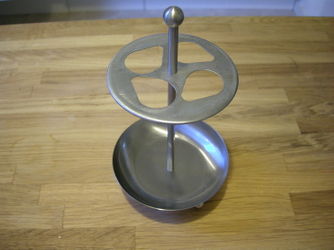
The metal part back on the holder. You see it's beat up, maybe I'll get a dremel or something to "brush" it nicely.
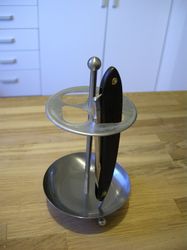
And my Wostenholm sits comfortably!


Some lessons learnt:
- Work more carefully.
- Draw the holes on the metal next time.
I got some hints on the forum on different materials to put on the edges of the hole. I'm considering a few options, but there are some nice materials available that'll fold around the metal.