Making Micarta scale material
Since many of members of SRP expressed an interest in Micarta as a material from which to make razor scales, ignatz has made time to properly document and illustrate the process.
Contents
What is Micarta?
Micarta is really nothing more than a composite of cloth or paper in glue. Long ago, the material was originally made with phenolic glue, but for our purposes epoxy resin is more convenient. Almost any cloth should work, although my preference is for simple woven cloth from natural fibers such as cotton, linen or silk. In my opinion, stretch fabrics are probably less interesting as they might contribute to the finished Micarta sheet being somewhat too flexible. The reason for my choosing a cloth made from natural fibres is simply from a fear that some sort of chemical reaction between the epoxy resin and synthetic fibers could end up making for a weak result. Another cloth material that could be used is fibreglass. Structurally it is excellent and is totally compatible with epoxy resins. I just don’t think that fiberglass is so very pretty for the purpose of making decorative razor scales.
Paper may also be used within the composite, but one must take care that the paper is sufficiently porous to fully absorb whatever resin you use. If you chose to use some paper with a plasticized upper surface (inkjet photo papers, for example) it is possible that the plasticized surface would not allow the resin to permeate sufficiently and that the resulting piece of Micarta might later come apart, shearing along the (insufficiently impregnated) inner paper surface. This is definitely not desired.
Do be aware that cloth or paper will no longer appear the same once drenched in resin. This is somewhat akin to the way that clothing changes appearance when wet. Most usually, colours become darker and somewhat less brilliant. Additionally, some measure of opacity is lost. Paper, even more so than cloth, may take on a very different look when wet than when in the normal dry condition. The rule is: If there is any doubt, experiment on a small sample first before committing your time and materials to a finished product.
Choosing the right epoxy resin
We are choosing for epoxy resin as the glue to bind our Micarta. However, there are many epoxy formulations and not all of them are equally suited to our purposes:
- The correct epoxy should first and foremost have a slow set and a relatively long working time.
- The working time is that amount of time between first mixing the resin components together and when the mixture starts to gel (thicken). An epoxy resin with a long working time is what we want, since we are going to carefully apply it to each layer of cloth in our lay-up.
- The setting time (also known as the curing time) is that amount of time it takes the resin to harden to the point where it can be safely handled and/or used. In general, an epoxy with a long working time will have a long setting time. Do please note that once the usual setting time has elapsed your epoxy will have a reasonable hardness, but that in some cases the absolute hardness of the epoxy resin will only be reached after some additional time has passed (hours or even days). This varies from epoxy to epoxy and so one will want to consult the technical information sheet for the particular formulation one is using.
We are also looking for an epoxy which does not exhibit a strong color influence on the final result. Again, in this regard, not all epoxy formulations are the same. For many industrial purposes, color and or transparency may be of no importance at all when compared to other more important qualities such as strength, water resistance, heat resistance and so on.
I am fortunate that the epoxy formulation I am using is rather good in all the aspects that pertain to the hand lay-up of Micarta sheets. This epoxy formulation is intended for pour-surfacing of floors and table tops. Although each of the two components have a bit of color on their own, when mixed together they become water clear. The working time is something like twenty to twenty-five minutes (20-25 minutes) and the setting time is about twenty-four hours (24 hours). During the working time, the consistency of the mixture begins by being only slightly thicker than milk, becoming rather more like syrup near the end of the working time. As a final benefit, this epoxy formulation has the quality of filtering out UV rays. This should offer a measure of additional protection against color aging of any cloth or paper within the matrix of my Micarta.
A few words about temperature
A few words about temperature are in order at this point. A minimum amount of heat is a requirement for epoxy resins to set. Most curing times (setting times) are expressed as the amount of time required for the mixture to harden when at room temperature (20°C = 68°F). If one lowers the room temperature, the setting time will be increased. Lower the temperature too much and the required chemical reaction will slow to the point where the epoxy will fail to cure. Extra heat (increased temperature), on the other hand, will accelerate the chemical reaction, thus reducing the setting time.
The chemical reaction that enables Epoxy resins to harden is exothermic. ‘Exothermic’ is a fancy way of saying that the chemical reaction generates heat. The larger the mass of the curing epoxy, the more heat that tends to collect. And, since increased heat tends to generally accelerate the setting time of epoxy, it can be that both the working time and the setting time will be reduced if that heat is allowed to build up. Some hobbyists have reported this effect when mixing up large batches of resin. In practical terms this can mean that the rate of hardening can accelerate such that the mixture hardens while you are still trying to apply it. In the small amounts and the thin layerings of epoxy which we will be using for creating scale material this should not be a problem. Just remember to stay away from the extremes of heat and cold when using epoxy resins.
Some of you may be interested in knowing exactly which epoxy I have chosen to use and why. This mix is simply called Epoxy RP 025 UV, supplied in this area by a company called Assyst, located in Mechelen, Belgium. As I previously stated, it is actually intended as a poured floor covering, but I purchased it at a local art supply store where they sell it for use in making epoxy-encased objects (flowers in epoxy cubes and that sort of thing). I didn’t know it would work for my intended purpose until I tried it, but ended up being really satisfied with the results. If you are reading this from somewhere close to my area (Belgium), then you might wish to visit the Assyst web pages (Dutch & French language) to check up on what they offer: http//www.assist.org
I know that a great many of you are reading this in other parts of the world and will not be able to find the same epoxy formulation that I am using. My apologies, but I cannot give any reliable advice concerning either epoxies or suppliers of same outside of my own area. If you decide you wish to try your hand at making Micarta then you will have to look around and make your own best decisions regarding which epoxy to buy and where.
A cautionary note on safety

A cautionary note on safety using epoxy would be in order.
- Be aware of possible fumes from the epoxy resin. These fumes could come from either the resin or the hardener in the uncombined liquid state as well as the possibility of fumes emanating from the epoxy mix while it cures. Whatever epoxy formulation you choose to use, you can assume that breathing the stuff is not healthy. So I can only recommend that proper ventilation of your workplace is a very good idea.
- Likewise, keep those hands clean. Epoxy resins are not biologically friendly and induce allergic skin reactions in some people, so try to avoid direct contact whenever possible. See those disposable gloves in the photo? Get some for yourself and use them.
- Finally, do please try to dispose of any leftover resin in a responsible manner. Respect our environment.
Choosing the right cloth

Cloth is much simpler to get your hands on. For me, I just went to the local sewing supplies center and purchased a few half meters of some colored, cotton cloth. But it is just as simple to grab an old pair of blue jeans or other colorful bits of cast off clothing.
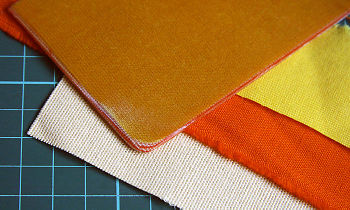
The cloth measures as 0.25 mm thick for both the yellow and orange cloth, while the cream measures 0.45 mm in thickness. The seven layers of cloth – 2 yellow, 2 orange & 3 cream – give a total measured thickness of 2.2 mm when dry. Depending on the epoxy fill and the clamping pressure, the actual thickness of the finished Micarta may end up being slightly more or very slightly less.
Using a brush effectively

Applying the epoxy will require a brush. Whatever brush you decide to use, it will end up as a one-time throw-away. This would suggest that a cheap brush would make the most sense. I know that some of you use those little metal-handled brushes meant for the application of glue or acids. I cannot seem to find a source for them over here, so I use inexpensive paint brushes which come in a kit of four of five together.
The brush in the picture has two faults. First of all, it is somewhat larger than I want for this purpose. That means it will suck up a greater portion of that valuable epoxy resin (waste). Second of all, cheap brushes often tend to be badly glued so that they shed hairs… right into the work. This is definitely not cool.
My solution to both of those problems is to tie off the brush with some string or carpet thread. This effectively shortens the brush, reducing the amount of resin it will suck up. Additionally, this stabilizes and holds the hair very tightly. I added to the effect by putting a few drops of super glue onto the brush hairs above the tied-off portion.
Making Micarta scale material, step by step
Now there isn’t much mystery about the actual mechanics of making Micarta. At its simplest it is resin-impregnated material which is pressed together. There are some fancy ways of doing this using hydraulic presses or vacuum bag outfits, but since most of us have more modest budgets, I am applying pressure to my Micarta with simple wood clamps. I have seen others who used two, flat pieces of wood for the purpose of pressing the Micarta. My approach is slightly different in that I use one piece of wood to serve as the top half of the press, while the bottom half of my press is a thick slab of stone. Since stone does not bend, it guarantees that at least one surface of my finished Micarta is properly flat. By the way, that is a slab of Belgian Blue Stone. The better grades are sometimes used for inexpensive hones, but around here it mostly serves for door thresholds, floor tiles and window ledges. It is so common that people throw away used bits of it without a second thought.

The stone is supported on two blocks of wood so that the wood clamps I am using to apply pressure have some clearance away from the table top. On top of the stone you can see a sheet of paper. This is a special sort of silicon treated baking paper which is intended for use in the kitchen (cookies, bread, etc.). It is heat resistant and nothing sticks to it, so it is the ideal stuff to keep my epoxy-drenched Micarta lay-up from sticking to the stone. And on the top of my lay-up will come a second piece of this silicon-treated paper baking paper, this time to separate the lay-up from the piece of wood on which I place the clamps. Standing on top of it all are parts A and B of my epoxy (resin and hardener). I’m used to epoxies where one mixes equal portions of both components, but in this case the ratio is 2 parts resin to 1 part hardener. Again, read the instructions for your own epoxy very carefully.
OK, let’s dive in and start the lay-up procedure.
- Making Micarta Scale Material
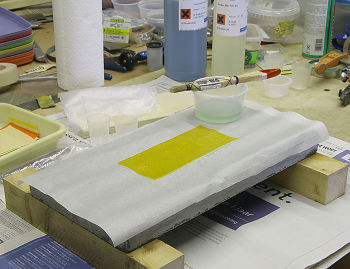
I’ve poured parts A and B into a disposable container and taken the time to carefully and thoroughly mix the two together. I brushed a few strokes of the mixture onto the baking paper and then laid the first piece of yellow cloth down into that, continuing to brush more of the epoxy resin onto the cloth until it is fairly saturated and looking ‘wet’ on top. I should mention that the size of that cloth is not arbitrary. It is large enough to allow the two halves of the new scales to fit on it comfortably with about 1 cm of margin all the way around. For the curious, the cloth pieces measure 7 cm wide by 16 cm long.
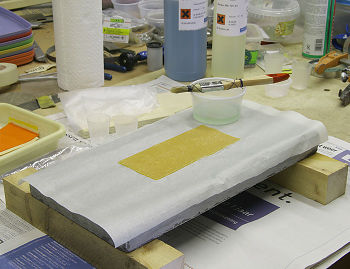
The yellow cloth is now backed up by a piece of cream colored cloth. Again, I brush in more resin until this piece of cloth, too, is completely saturated and wet looking. Remember how I mentioned that cloth can become slightly more transparent when drenched in resin? This is the reason that I am backing up the yellow with the cream colored cloth before placing on a layer of orange cloth. If the orange was layered directly behind the yellow I think it would affect the color of the yellow far too much. Even so, the cream colored cloth has also become slightly transparent so that to a degree one can see through it to the yellow color beneath.

OK, I’ve skipped ahead to the finished lay-up. All of the cloth has been stacked up and all of the resin has been used up in the process. This means that I made a pretty good estimate on how much resin to mix up (less waste). Of course, once I start applying clamping pressure to the stack a good portion of that resin is going to be squeezed out.
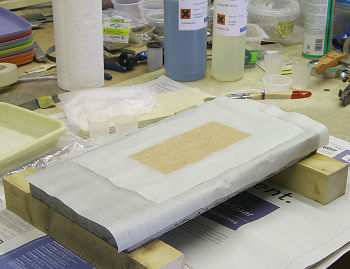
Here is that top piece of silicon treated baking paper to finish off the stack.
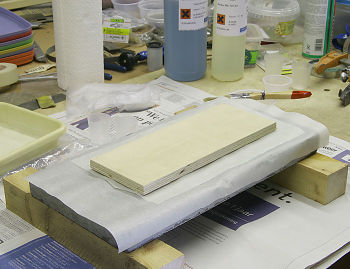
And on top of that final piece of silicon treated paper I place a nice flat piece of wood to serve as the upper half of my Micarta press.
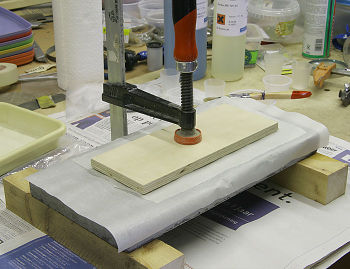
Now I start placing clamps. The first clamp goes dead-center in the middle. Start to tighten it only a little bit at first and only very, very, very slowly at that. Aim to get this clamp only ‘finger tight’. The reason for this is that the layers of cloth, saturated with resin will initially want to slip and slide relative to one another. If you try to apply too much pressure all at once you run the risk of the pieces of cloth sliding away from one another in all directions, thus spoiling the lay-up.
Now start adding additional clamps. Once again, the rule is 'not very tight' and 'very, very slowly'. Don’t crank down on these with hand power right now, instead keep thinking of just going for ‘finger tight’ on each clamp. You will also find that as you add each clamp and tighten it up a bit, you will have to return to clamps you previously placed and tighten them up a bit as well. This is because the stack of cloth is very gradually squeezing out the excess resin which is allowing the stack to reduce in thickness at the same time.
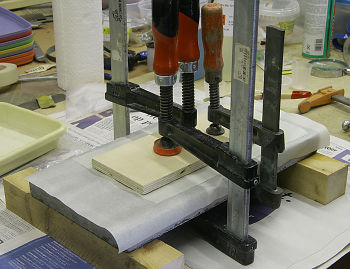
Yet additional clamps are added. Softly, softly is still the rule. Go for finger tight and don’t forget to evenly tighten up all of the previous clamps again.
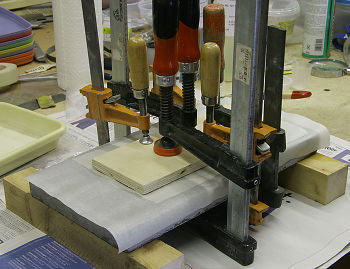
This is it, folks. I’ve got nine or ten clamps in place and there just isn’t room for any more on this tiny bit of real estate.
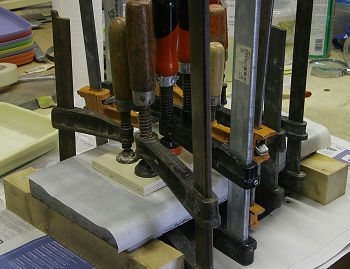
Again, go around and tighten the clamps, bit by bit. But this time gradually increase the pressure up to the maximum you can reasonably apply by hand. If you look carefully, you can see that the wood has flexed under the pressure of the clamps so that the very outer corners are bowed down towards the stone. Were I using two pieces of wood (instead of one slab of stone topped with wood) I would be much less certain of ending up with a flat result from the pressing.
That is all there is to it for now. We are going to leave the lay-up under the pressure of the clamps for the next 24 hours.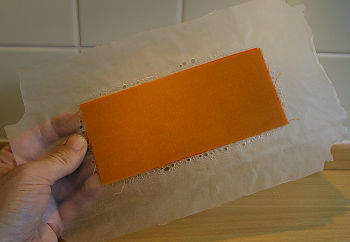
And at long last the epoxy is cured, the clamps have been removed and the final result is revealed. That clear plastic-looking fringe is all of the squeezed out epoxy.
What do we see? Well, for one thing, the end surface color has become a blend between the yellow, cream and orange. However, since the orange is the strongest color of the three it is taking precedence in the mix. I sanded off one of the edges and gave it a very quick buffing. You can see some of the striations which I think will add interest once the Micarta is turned into a set of scales. The final thickness did, indeed, spec out to about 2.2 mm on average. However, I noticed some unevenness in the thickness of the Micarta and I think that is due to the plywood bending too much under the clamping pressure. For future attempts I shall make a thicker, composite wooden pad to serve as the top of my press. That should minimize the variations in thickness to a degree.


Now that the process has been explained and illustrated from start to finish, some of you may be wondering about the economics of making your own Micarta.
Let’s tote this up, starting with the materials.
The cloth is the big unknown. Either you buy it new from the store like I did, or else you raid the rag bag for some fine cast-offs. I will arbitrarily set the cost of the cloth I actually used at no more than 2 euro.
Epoxy-wise I used 45 ml of parts A & B together to make this particular sheet of Micarta. I originally purchased 1500 ml of the epoxy at a cost of approximately 53 euro ($75 at current exchange rates). Doing a quick bit of math, I figure I can make perhaps 30 pieces of Micarta of similar size using the resin at this rate. And that would put the cost of resin per pair of Micarta scales at about 1.75 euro ($2.50).
Then there is the cost of a disposable brush and disposable gloves, plastic mixing container and a couple of sheets of that silicon treated baking paper. I’ll add in 1.25 euro for all these things together.
That brings my actual material costs to around 5 euro (about $7.15).
Finally, we have the actual time spent on doing the cloth cutting, lay-up and clamping. This whole thing took me about four hours. But only about twenty-five minutes of that was the actual lay-up. Most of that time went into preparation in the form of collecting and preparing the tools and materials as well as documenting the process and setting up the camera and taking pictures. Normally, I should be able to get this all done in slightly more than an hour. So we can throw in the charge for one hour of work on top of our material costs.
All things considered, I think the cost for creating one’s own custom Micarta scale material is very reasonable.
Also keep in mind that for the purposes of this demonstration I have kept the Micarta fairly simple, but there is no reason why you cannot explore all sorts of special creative options. You can fold the cloth, weave it together or twist it. You can also embed such things as colored threads, string or even small bits of metal or wire. You can also add coloring materials to the epoxy (!). Feel free to experiment and enjoy yourself.
And now to start working on a set of scales. But that is best left for another article. ;)